Pragmata is Capcom’s new IP that narrates a science fiction action-adventure video game with an innovative third person shooter combat. The same studio that brought us Resident Evil and Street fighter, delivers a graphical and technical spectacle worthy of a major production while never losing sight of its entertaining purpose.
A Brief Glimpse into Pragmata’s Story
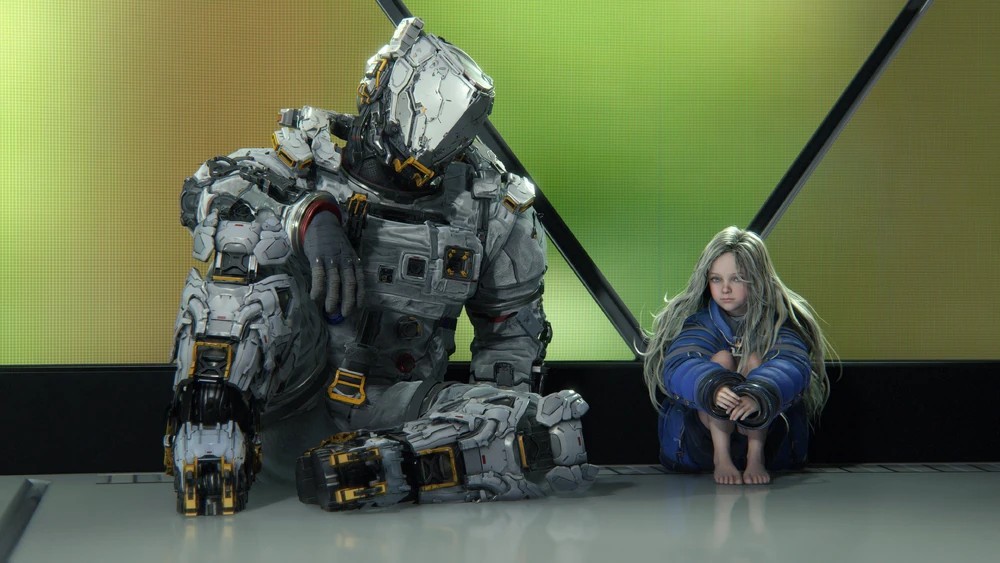
The astronaut Hugh becomes separated from his crew and encounters an unusual android, immune to the AI’s control and resembling a girl. Faced with the urgency of the situation and in need of assistance, he names her Diana, and the two set off on a shared journey. This moment marks the beginning of a deeply human relationship.
Their objective is clear: survive, uncover what has happened, and find a way back to Earth. Diana’s childlike curiosity, warmth, and innocence stand in contrast to Hugh’s initial detachment and resilience.
A Dual And Multitasking Fight System
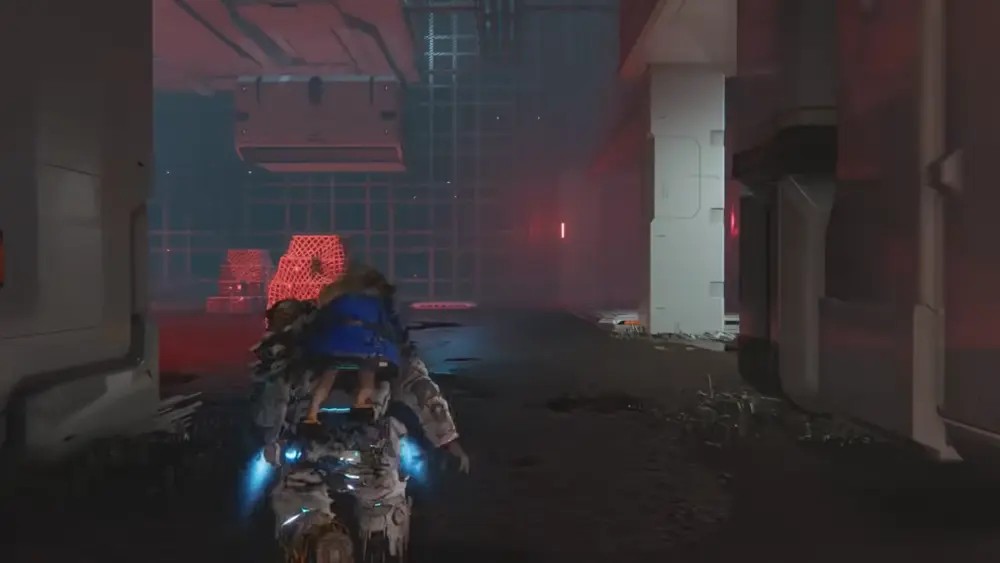
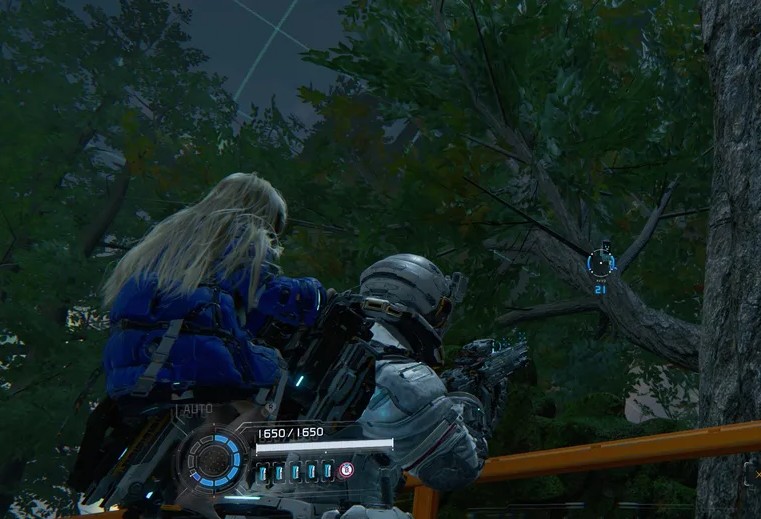
In Pragmata, combat involves both Hugh and Diana and revolves around their synergy. Before dealing damage in combat, Diana will hack the enemy via a grid-based mini-game that appears when aiming. Completing these short mazes weakens enemies, leaving them exposed, more vulnerable to Hugh’s weapons.
As the video game progresses, the hacking grids become more complex, introducing obstacles and additional nodes that can boost damage. Hacking isn’t strictly required during combat. However, it is highly effective for staggering enemies and dealing damage from a distance.
❗It is important to note that the enemies remain active during hacking, so you’ll need to dodge and stay alert while managing both characters.
Save Boxes Locations In All Sectors
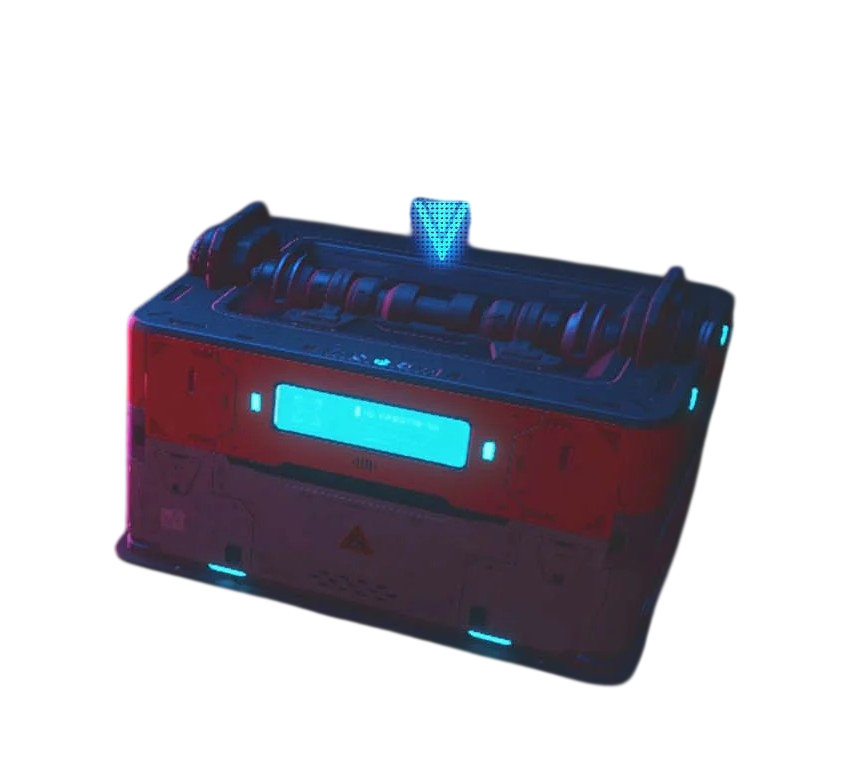
Save boxes in Pragmata are white and orange crates that contain either cabin coin, at least one Upgrade component, and Lunafilament used to improve Hugh, Diana, and their gear. Some of these boxes are initially inaccessible until you unlock the ability to destroy coloured crystal.
Smaller and yellow supply boxes are also worth collecting. As they provide useful items such as Data Shards or Repair Kits for healing.
Solar Power Plant ( Sector 01)
Power Distribution Center
Safe box 1
You’ll find the first safe box against the wall of the small room tinder the locked door. It is accessible by heading up the staircase on the lower eastern section of the power distribution center, and heading through the narrow hallway.
Safe box 2
Under the walkway into the main area, this section can be accessed by moving through the Filament Mass. Clear this section using Cleanse, and defeat all enemies. Once the area is secure, look for a hidden holo-wall and pass through it. Directly ahead, you’ll find a safe box.
Safe box 3
The third safe box is located at the bottom right area of the Power Distribution center. Past the movable platforms. You’ll find the safe box against the wall, between platforms. Once you’ve collected what is inside, you’ll need to hack the panel on the wall in order to rearrange the boxes and leave the area.
Mass production Array (Sector 02)
Test Site Entrance
Safe box 1
The first safe box is located across from the beacon. You can jump across from the bridge onto the wooden platform. The safe box is next to the wood ramp. You should have activated the ladders before to get a quick return.
Safe box 2
Head to the diner with the neon lettering. Use the lime eraser to clear the path and enter the diner. You’ll find the safe box right before the counter.
Safe box 3
The third safe box is inside the Nouvelle shop. Using the lime eraser, clear your way in. The safe box is in the middle of the shop and easy to find.
Side Alley
Safe box 1
The only safe ox in the side alley is on top of the trash truck. This safe box location is available after activating the beacon and going up the zip line. From here, you can jump down onto the trash truck.
Shopping District
Safe box 1
Activate the beacon to go up the zip line, follow the bookshelves until you reach the end of the corridor. Collect the Multihack Node, you’ll find three walkers on your right. Eliminate all three enemies and continue on your right to reach the end of the corridor. You’ll find the safe box here.
Safe box 2
This is one of the easiest. Under Diana’s neon sign, go through the door. You’ll find the save box right in front of you.
Safe box 3
From the second safe box, go up the stairs on your right And follow the upstairs corridor until you reach the door. On the wall on the left, climb both boxes and walk through the holo-wall. Keep going until you find three walkers, the save box is behind them.
Safe box 4
After hacking the first node, keep walking forwards until you find mannequins, at the end of the corridor you’ll see the safe box in a room with mannequins hanging upside down. To deactivate the lasers before the safe box, go back and climb the wall where the mannequins are to find a hack panel.
Safe box 5
Facing the Nouvelle shop, turn right and go through the door to enter the diner. Walk around the wall to find the hack panel, this will activate the elevator. Walk to the end of the corridor to enter the orbit store. Turn right and go up the zip line. Form up here, jump down on the platforms until you see the “rip tide” billboard. Next to it you’ll see the second level of Diana’s. Jump there, you’ll find the safe box behind the Filament Mass.
Business District
Safe box 1
The first Safe box is down at the bottom of the building against a wall and on the right side of the taxi.
Safe box 2
From the first save box in this district, continue ahead and turn right at the door. Enter the area and turn right to access the lab between the taxi and the black car. You’ll find the safe box on the wall at the far end of the room.
Safe box 3
Exit the safe room and head to the right, follow the path to the elevator and destroy the filament masses on the way. When you exit the elevator, walk to the other side of the room and locate the hack panel on the centre tower. Once hacked, climb the platforms and follow the path until you find another Filament Mass. Erase the mass and jump to that location. From here, look back to see the safe box on the opposite ledge.
Safe box 4 and 5
From the location of the first safe box, carry on straight ahead and go up the ramp, clear the Filament Mass, and go up the zip line. You’ll find both save boxes behind more Filament Mass.
Lim Recycling Facility
Safe box 1
In the safe room in this area, climb up to the big pipes using the boxes on the right wall. Follow the pipes to the next room. You’ll find the safe box at the end of this room on the platform in front of you.
Safe box 2
From the location of the first safe box, jump down and go through the door into the next room. Go down the ramp with the laser and turn right to hack the panel and deactivate the lasers. The safe box is on the upper level next to the ramp. Jump to find it.
Safe box 3
Jump back to the ramp and continue straight ahead. You’ll find the third box inside a small room behind a holo-wall.
Terra Dome (Sector 03)
Terra Dome Entrance
Safe box 1
From the end of the bridge jump left to the hanging crate, then continue jumping from crate to crate. When you reach the area with grass jump down, you’ll find the safe box here.
Safe box 2, 3 and 4
Enter the plant factory and go to the elevator. Once on the upper floor walk around the wall and through the door. Next, go down the stairs, and continue right and through the door. You’ll find the three safe boxes at the end of the path after defeating the enemies.
Safe box 5
The fifth save box is hidden in the Eco Modeling Lab. Take the main elevator and walk to the Sol Research entrance. There, behind the stairs. Jump into the gap between the platform and the wall. You’ll find the safe box on a ledge on the wall.
Eco Modeling Lab
Safe box 1
Use the gen hip to restore the bridge gap and go upstairs. Head right and you’ll find a holo-wall. Pass through the wall and turn right. The safe box will be right in front of you.
Safe box 2
Return to the stairs and head down. The second safe box is hidden under a collapsed wall next to a red Lunafilament growth.
Safe box 3
From the second safe box, turn left to the red Lunafilament growth. The third safe box is in the room behind this growth. You’ll need a specific tool to destroy this growth.
Safe box 4
From the stairs, head down and climb on top of the fallen beam. Walk up to the Filament Mass and use the Lim eraser to go through. Head down to the other side and defeat the enemies. The safe box is in the upper left corner of the room.
Safe box 5
After defeating the sector guard, turn right at the pure Lunum crate, and follow the corridors until you reach a holo-wall. Go through this holo-wall and you’ll find the next safe box right in front of you.
Soil Research
Safe box 1
Enter the Sol Research facility and go through the second door. At the garden, follow the path right and you’ll find the safe box at the end of it.
Safe box 2
From the first safe box location, go back and follow the left path until you reach the beach. There, turn left. You’ll find a Filament Mass and use the Lim eraser to go down the stairs. Walk to the end of the corridor. The safe box is in the room at the end of it.
Safe box 3
From the beach, get back to the path you came from and turn right to go down the tunnel into the lower level. Follow the path to the Elevator. Once in the upper level follow the path past the tree and once you enter the door, turn right.
Safe box 4
From the third safe box, turn around and walk to the other side of the corridor. Find the hack panel to unlock the door. Turn left and follow the stairs, then jump down twice and you’ll find the safe box hidden between plants.
Safe box 5
Go back to the beach and turn right, enter the room through the door unlocked during the last safe box and access the elevator. one in the lower level, pass though the hollo-wall on the right. The safe box will be in that room.
Safe box 6
From the fifth safe box, return to the elevator room and turn right. Clear the Filament Mass, to enter that room. The Save box is on the left side of the tree.
Safe box 7
From the sixth safe box go back to the elevator room and hack the door on the left. enter the room and follow the path maintaining the floral mass on your left. At the end of the path you’ll find the safe box.
Safe box 8
From the seventh safe box turn right and interact with the console to clean the flora on the room. Then turn back and go through the, “now”, cleared arch. Jump down and go through the first door. Turn right and go through the second door and continue walking until you reach the room with a long desk and chairs.
Safe box 9
From the eighth safe box, go back to the map room and hack the door on the left. Enter the room and turn left, clear the Filament Mass and go up the boxes. Jump down and hack the next door. The safe box is on the ledge on the right.
Safe box 10
Jump down from the ninth box and hack the panel up on your left. This will elevate the platform. Levitate onto the next ledge. Here you’ll find the final safe box.
Lunum Mines (Sector 04)
Mine Entrance
Safe box 1
The first safe box is on top of the ledge, access it by dropping the container then hopp between platforms to reach it.
Safe box 2
Unlock the cleanse ability of sector 05 to access these two last boxes. Find the Sandworm Luna digger creature. Here you’ll find a red mass of lunafilament that blocks the door. Follow the path, glide through the laser trap and defeat the enemies before opening the safe box.
Safe box 3
Back upwards on the platforms, defeat the enemies and dodge the lasers. Find the gap on the ceiling and go up to enter the room. You’ll find the last safe box here.
Main Excavation Site
Safe box 1
from the exterior of the main excavation, jump up the three crates stack like a pyramid. jump on to the second level of the building, and enter the corridor. Turn left and move the crate so you can jump down to the floor level. Turn left and then right to find the safe box.
Safe box 2
Explore inside the ruins, in the lower half of the area, behind the red filament, you’ll find the safe box.
Safe box 3
Go outside the Logistics Management tram station and turn right on the orange crate. Reach the stairs and continue up. You’ll find the safe crate there.
Safe box 4
Go outside the Logistics Management tram station and jump on to the lower level. Defeat the enemies and use the Scan to find the safe box on your right next to some Filament Mass.
Crane Operation Yard
Safe box 1
Enter the building and go upstairs, turn left and border the stairs to the other side. You’ll find the safe box there.
Safe box 2
Exit the top of the building and hack the panel to lower the orange crate. Jump down, climb the orange crate and climb the ledge to find the safe box.
Safe box 3
From the location of the second box, climb down. Access the building in front of you from a holo-wall on the left side of the building. You’ll access a library-like room. You’ll find the third crate there.
Warehouse
Safe box 1
For the first Safe box, you’ll have to solve the orange crate maze. Moving from one room to another in order to move the crates and access the safe box.
Safe box 2
From the puzzle to access the first box, you’ll notice there is an orange crate you can move into the middle of the room. Use it to climb to the ledge where you’ll find the second safe box.
Safe box 3
From the security zone, access the room with multiple white crates and move the first orange crate to use it as stairs. Climb on top of the white crates and you’ll see the next save box on the left corner of the room.
Safe box 4
Jump down and move the orange crate again. This time, to the opposite direction and climb to the white ledge to find the safe box.
Safe box 5
Following the path from the white-crated room, you’ll enter a room full of orange crates. Move these crates to create a staircase from left to right to reach the next safe box.
Nexus Tower
Safe box 1
Before heading down the main frame, Use the object scan to spot the safe box on a nearby platform within jumping distance.
Safe box 2
At the bottom of the room, use object scan to uncover a safe box concealed behind a holo-wall.
Central port (Sector 06)
Research sector
Safe box 1
Leave the tram stop behind and turn left following the platform. The safe box is right ahead.
Safe box 2
From the previous safe box jump to the large platform towards the door. Use object scan before moving on to reveal a safe box beneath you. Head down the stairs in the far corner opposite the door. Defeat the spawn enemies and cleanse the barrier before collecting the box.
Regolith Lab
Safe box 1
Run up the stairs to the left side of the platform and continue heading left. Defeat the enemies and hack the terminal. Go into the room to locate the safe box.
Safe box 2
Go to the room filled with black filament and jump around the room following the platforms until you reach the door. Once you go through the door you’ll see the safe box in front of you.
Lunafilament Lab
Safe box 1 and 2
Find the security zone in the room next to the tram. defeat the enemies and continue to the next room. Cleanse the red filament and jump down to find the two first safe boxes.
Safe box 3
opposite to the tram station there is a room filled with black filament. Here you’ll find a lock door that requires five hacked terminals. Behind this, clear the red filament to find the safe box.
Safe box 4
After encountering the holograms of Dr. Higgins and Eight, go pass them and turn left into a corridor. The safe box is at the end of it.
Orbital Elevator
Safe box 1
From the Orbital Elevator, turn right and follow the lunafilament trail. When you reach a large door, turn left to find the safe box.
Safe box 2 and 3
From the previous box, go down the stairs until you reach a large door and defeat the enemies. Enter the room and after defeating the enemies, locate the holo-wall. Follow the path and you’ll find both safe boxes.
Safe box 4
Approach the base of the Orbital Elevator and go up the stairs. If you follow your quest marker, you’ll eventually see the safe box.
Safe box 5
Run up the Orbital Elevator base, turn right and explore the platform. Then go inside to find the last safe box.

Down there, every place has its own kind of color
Follow Diana and Hugh’s adventure to find their way back to Earth! Discover every collectible in Pragmata and share your experience with other players in Gamers.Online.
Add Pragmata to your gamer CV and let us know If you found all safe boxes in the game.
Game on!

- Video Games and Grief: Memory, Loss, and the Power of Play
- Ubisoft Barcelona Lays Off Team Members From Assassin’s Creed Black Flag Resynced
- A Parent’s Guide to Board Games That Build Essential Skills
- Nintendo Switch 1 Discontinued in Europe: The EU Regulations Behind the Decision
- All The Lord Of The Rings Board Games, The Complete List