We are back with another Assassin’s Creed Guide. This time, we’ve elaborated a complete guide for the rifts locations and puzzle solutions in Assassin’s Creed Brotherhood.
Similarly to the glyph mission in Assassin’s Creed II, Desmond will find these rifts, or breaks in the programming of genetic memories within an animus simulation. These rifts conceal puzzles elaborated by Clay Kaczmarek (Subject 16) using coded numbers and letters, musical notes, and morse code.
In Assassin’s Creed Brotherhood, Kaczmarek made these clusters (groups of puzzles) to conceal information he had found on Abstergo’s origins as a templar group.
Here is our guide to every rift location and cluster solution in Assassin’s Creed Brotherhood.
Rifts location in Assassin’s Creed Brotherhood
First, here is a map of Rome for all the glyphs in Assassin’s Creed Brotherhood. In order to see each one of the rifts in the video game Ezio must use the eagle sight. These rifts will appear in shining blue light, similar to the glyphs in Assassin’s Creed II.
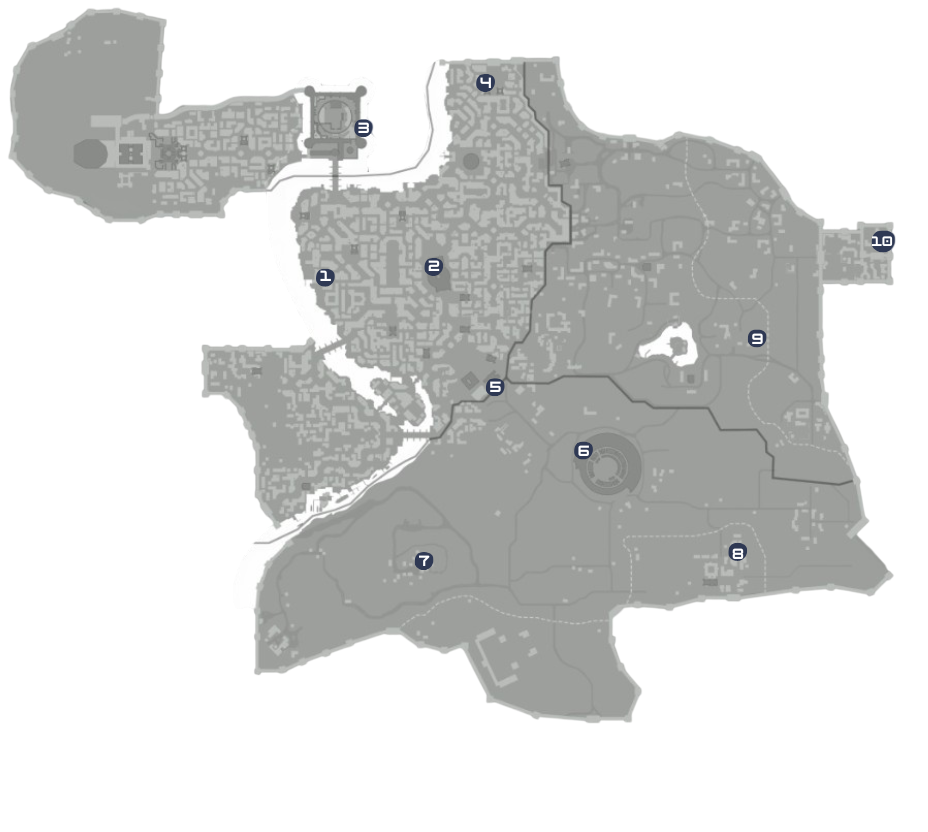
Unlike the first video game of the Ezio trilogy, in Brotherhood all rifts are located in one city: Rome. Due to the map’s size, in Assassin’s Creed Brotherhood, we’ll detail these locations, to help you find them more easily.
Each Rift Location in Detail
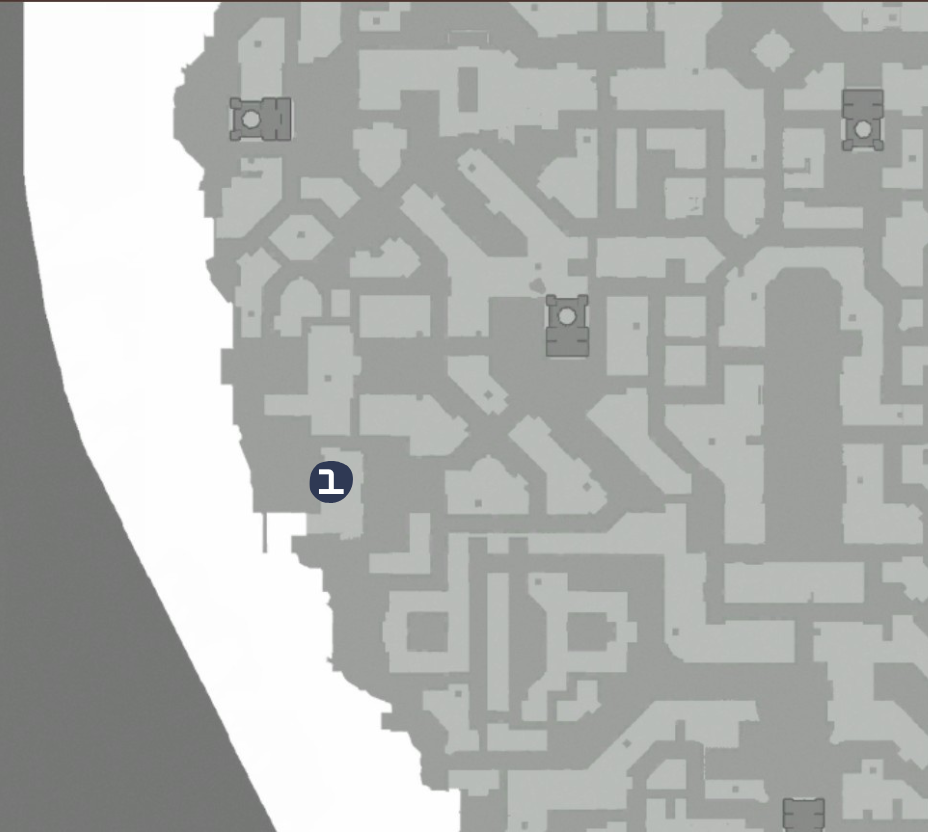
The first glyph is located on the northern wall of the Rosa In Fiore. The glyph is located on the superior part of the wall.
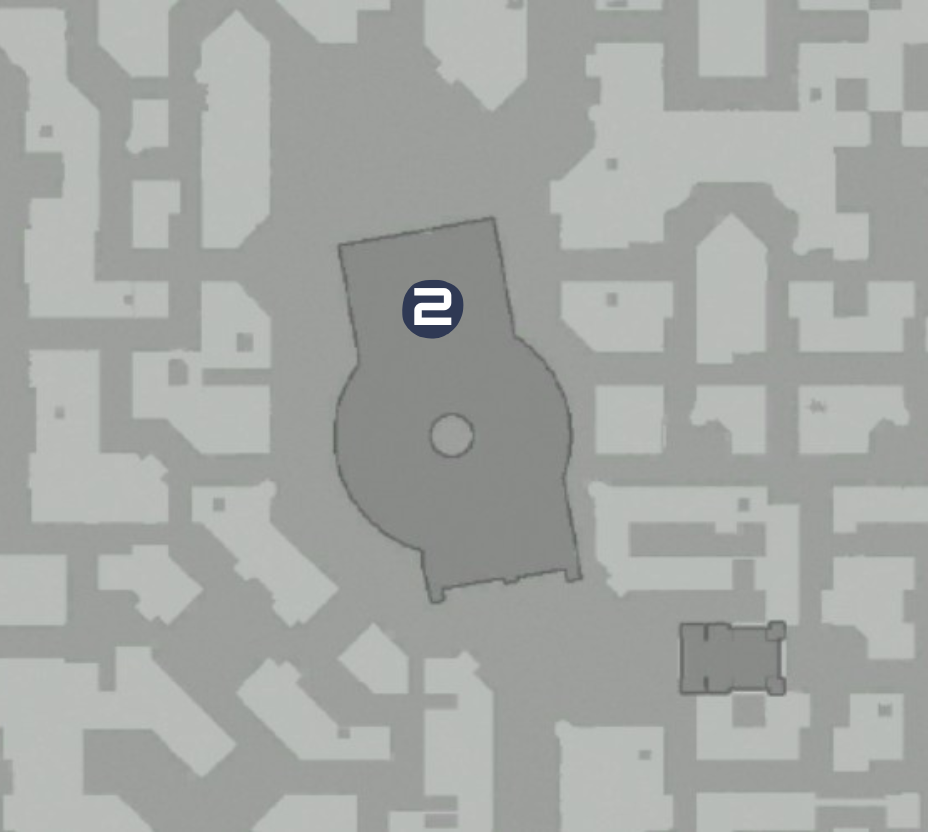
The second rift is inside the Pantheon. To find it, you’ll need to enter the building and climb to see it above the entrance.
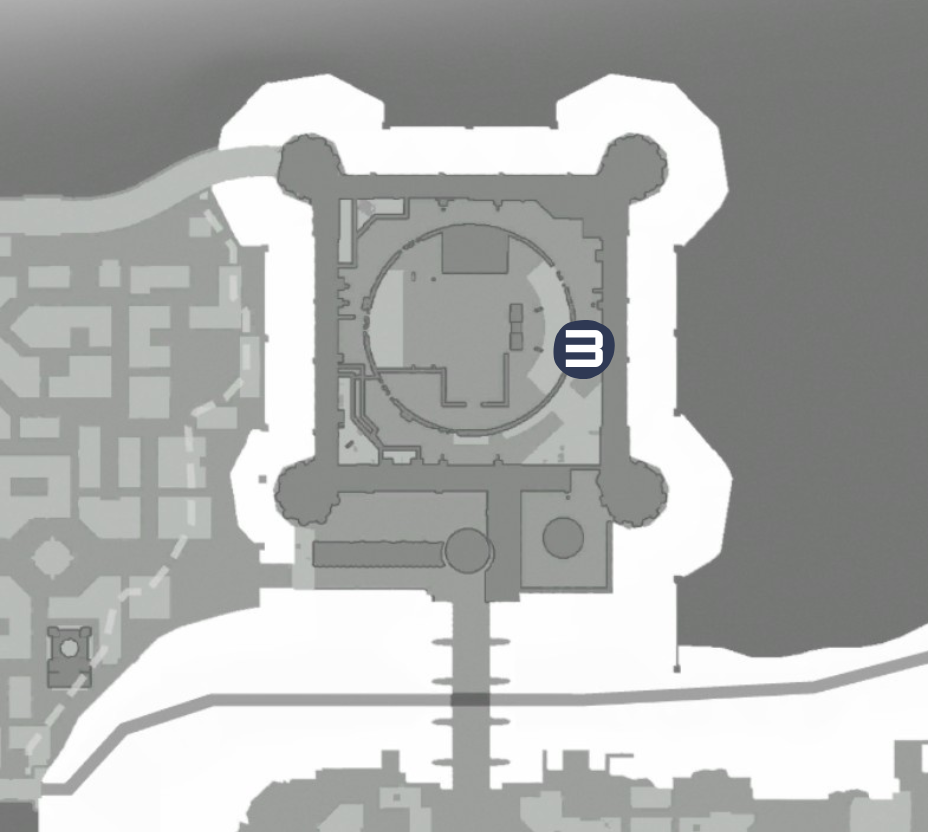
The third rift is located on the southern side of the Castel Sant’ Angelo. To access the location, swim following the bridge or cross the bridge hiding from the guards.
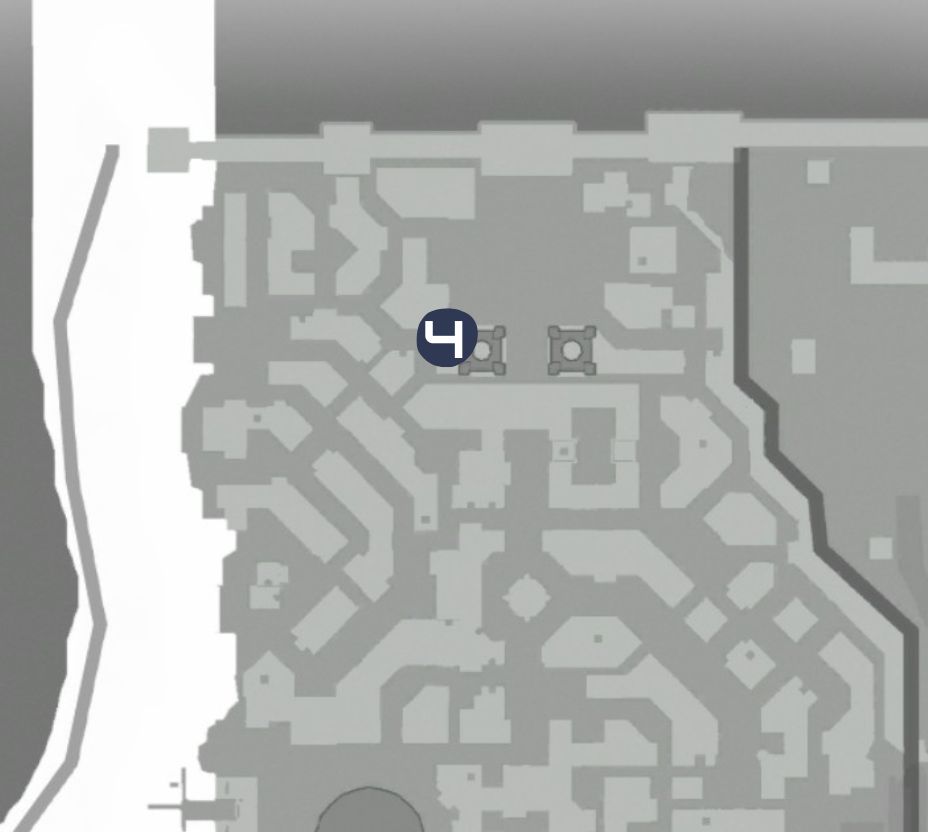
The fourth rift is half way up the left tower in the north part of the map. Here you will also find a Borgia flag and you can access a Cristina memory.
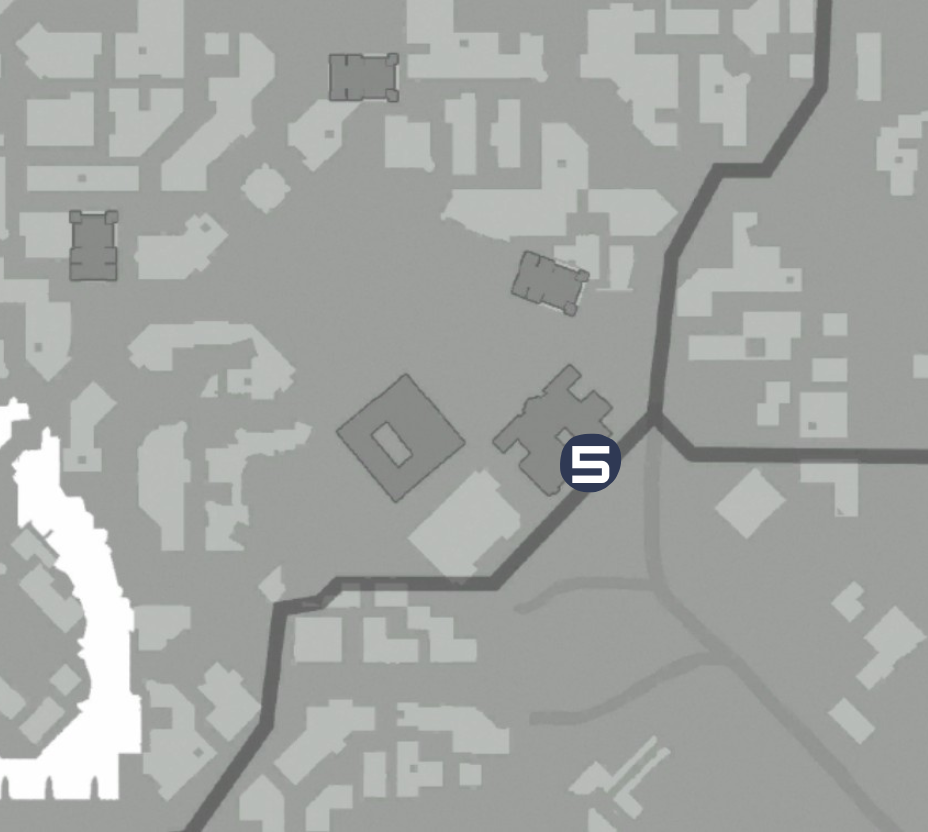
To find the fifth rift go around the Palazzo Senatorio. You’ll find the rift on the border of the antico district.
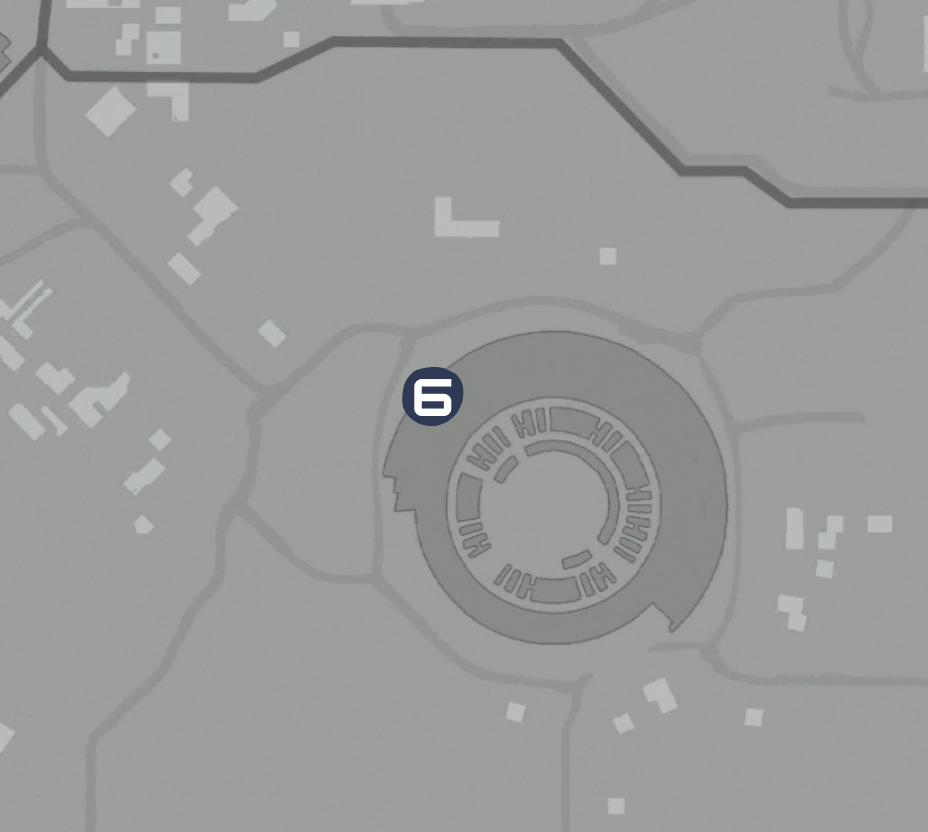
The sixth rift is near the top of the Colosseum. On the northwest side, on the outer wall.
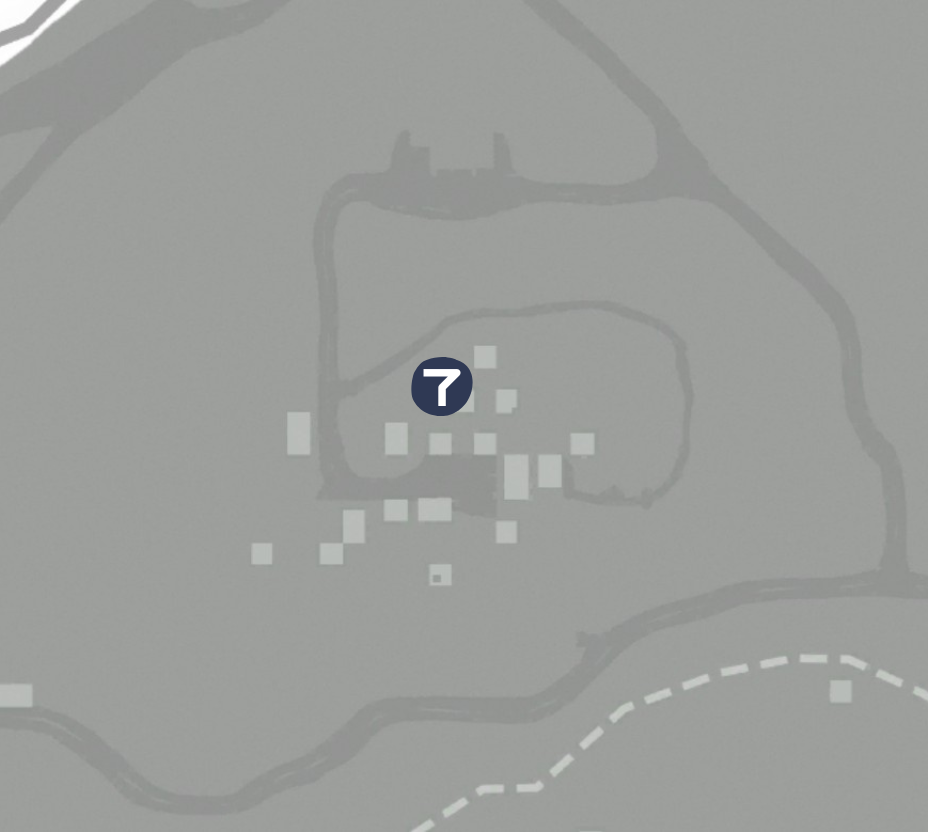
The seventh rift is also in the antico district on the south. Part way up a tower that’s beside the blacksmith of this little town.
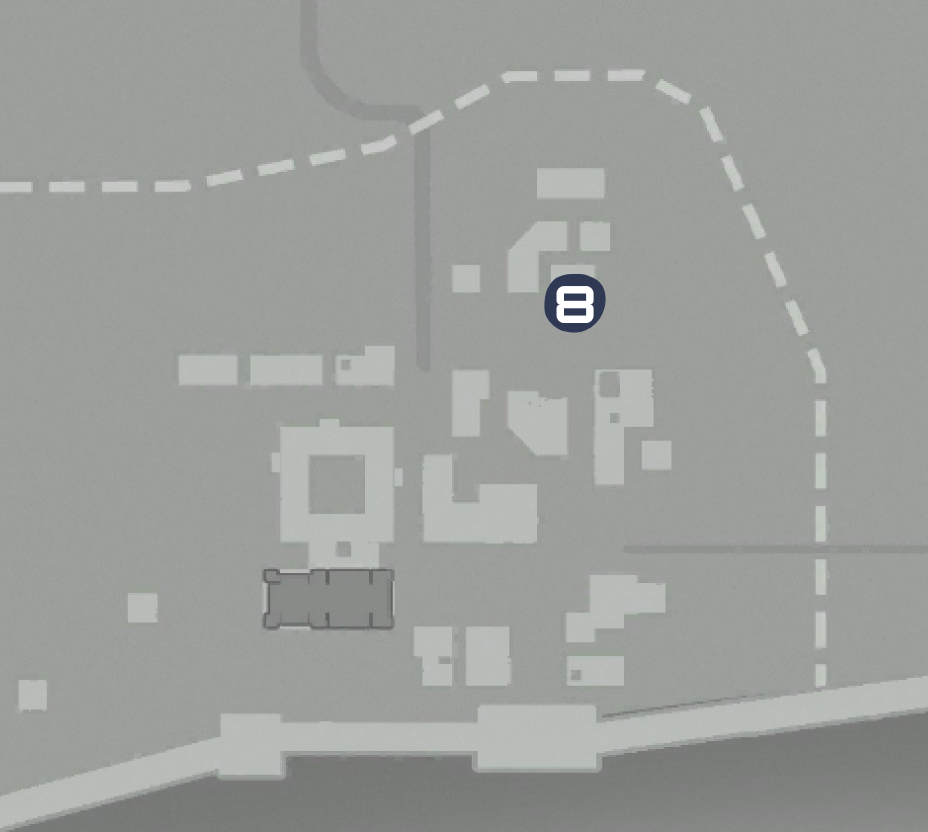
Travel to the southeast in another small town is the eighth rift. You’ll find it on the north side of the aqueduct that runs through the village.
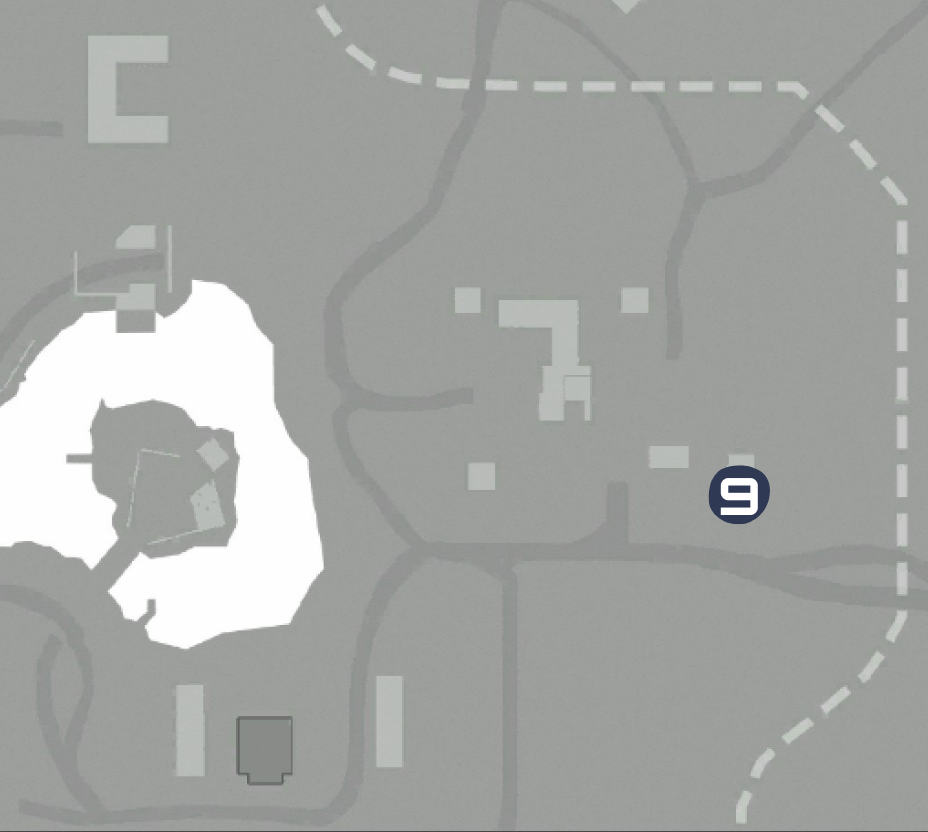
The ninth rift is in the Campagna district, on the outside wall of Bartolomeo’s fort, facing east.
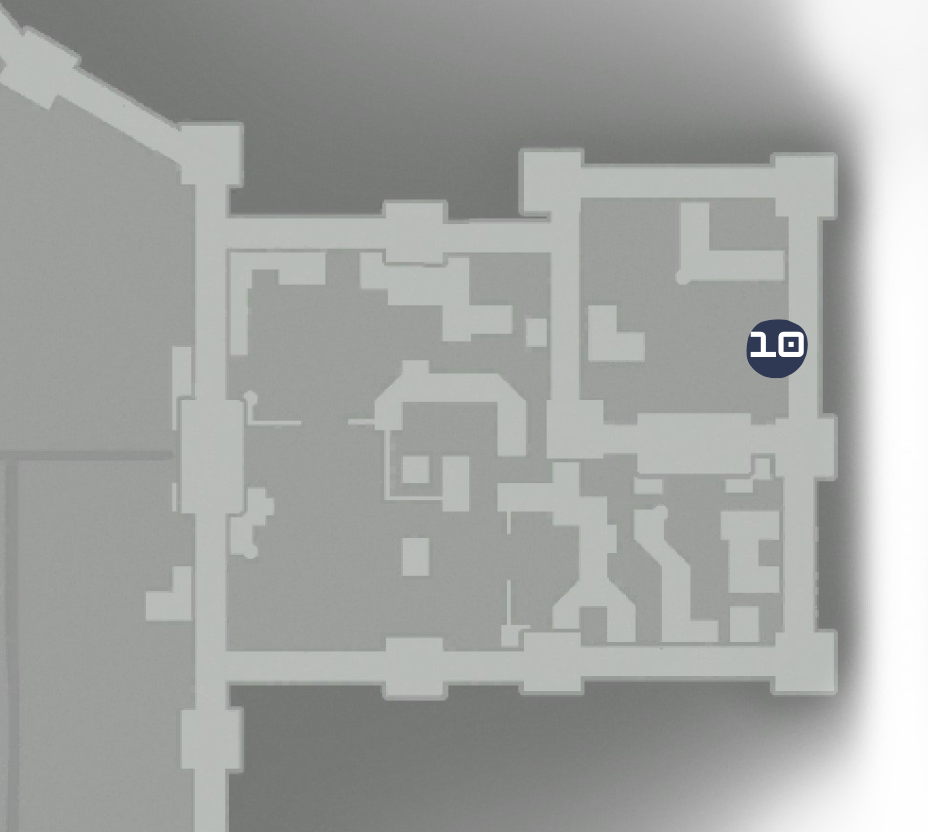
The tenth and last rift of the video game is inside the fort Castra Praetoria. You’ll find it in the courtyard, on the eastern wall.
Rifts Puzzle Solutions in Assassin’s Creed Brotherhood
In Assassin’s Creed Brotherhood, each rift triggers its own puzzle sequence, and the sequence always plays out in a fixed order. Therefore, the internal puzzles of the rifts do not change depending on which one you discover first.
Each rift, like in Assassin’s Creed II, is independent of each other. There is no predetermined global order to solve each cluster, nor do they depend on each other. So it does not matter which rift you scan first , you will still go through its full puzzle chain normally.
However, the only limitation for this mission is map access. This is because some rifts are placed in areas you can only access once you’ve progressed far enough in the story or unlocked specific view points.
Cluster 1
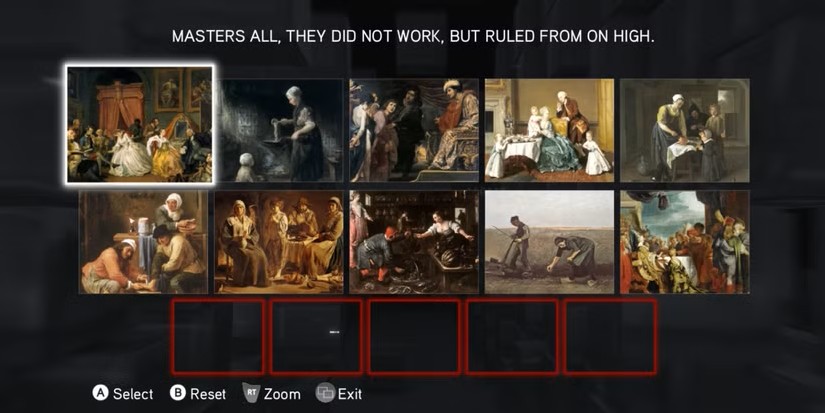
The first puzzle for the first cluster shows ten images from which you must choose 5, following the clue displayed above.
“MASTERS ALL, THEY DID NOT WORK, BUT RULED FROM ON HIGH.”
Solution: Select all five images of aristocrats not doing any work. Images 1, 3 and 4 on row one. Images 3 and 5 on the second row.
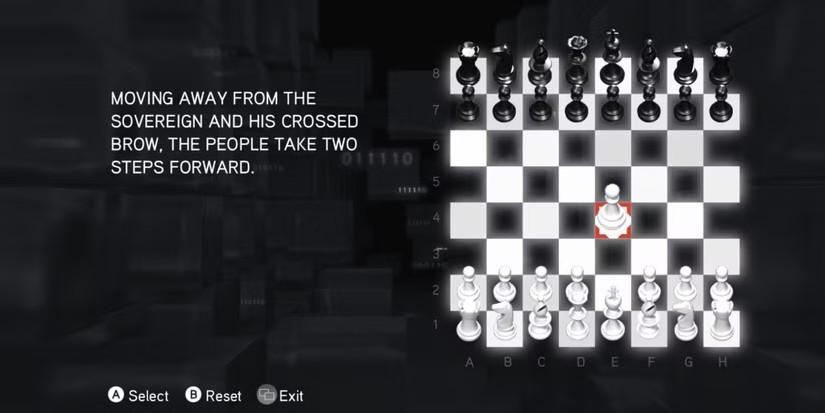
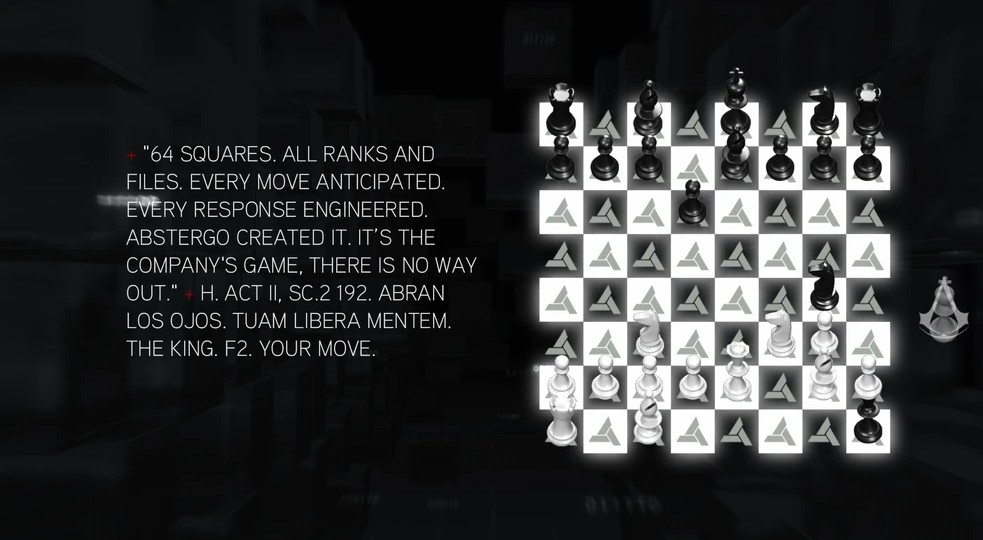
Following to the second puzzle is a chess board that will also appear in other future clusters. Here you’ll have to move a piece according to the hint displayed on screen.
“MOVING AWAY FROM THE SOVEREIGN AND HIS BROW, THE PEOPLE TAKE TWO STEPS FORWARD.”
Solution: Move the pawn from E2 to E4.
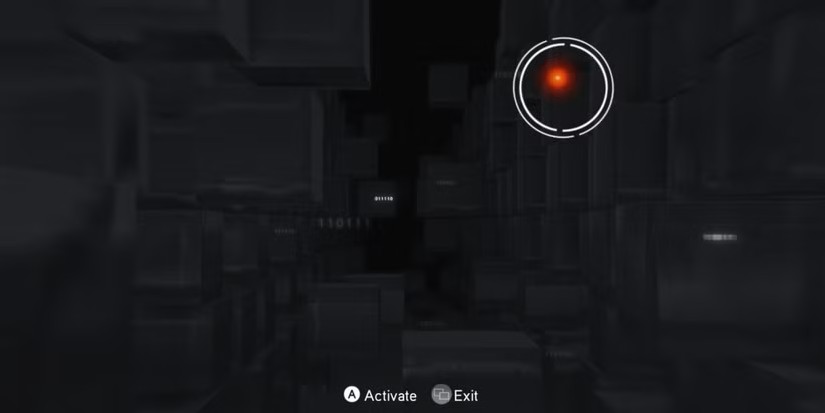
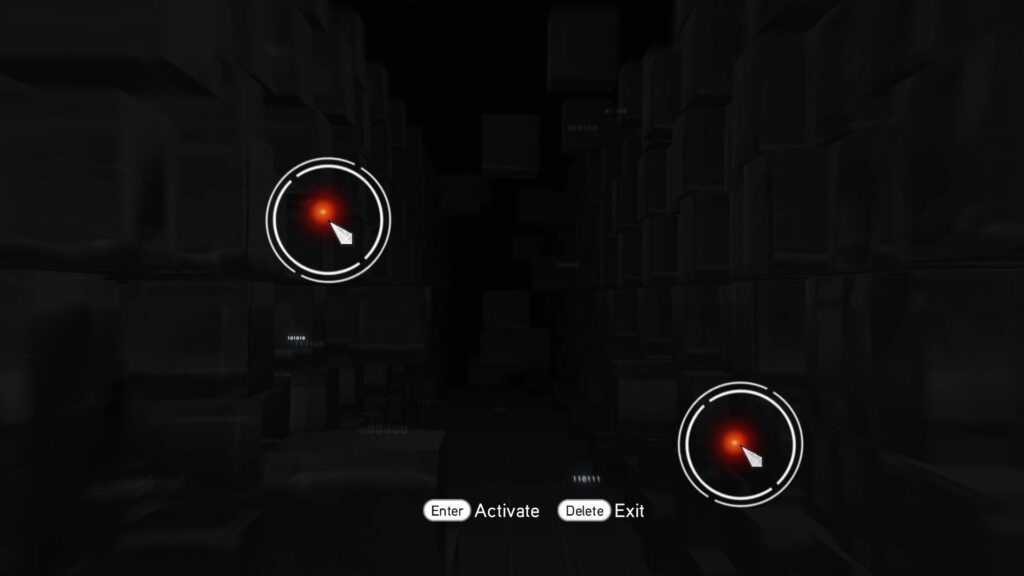
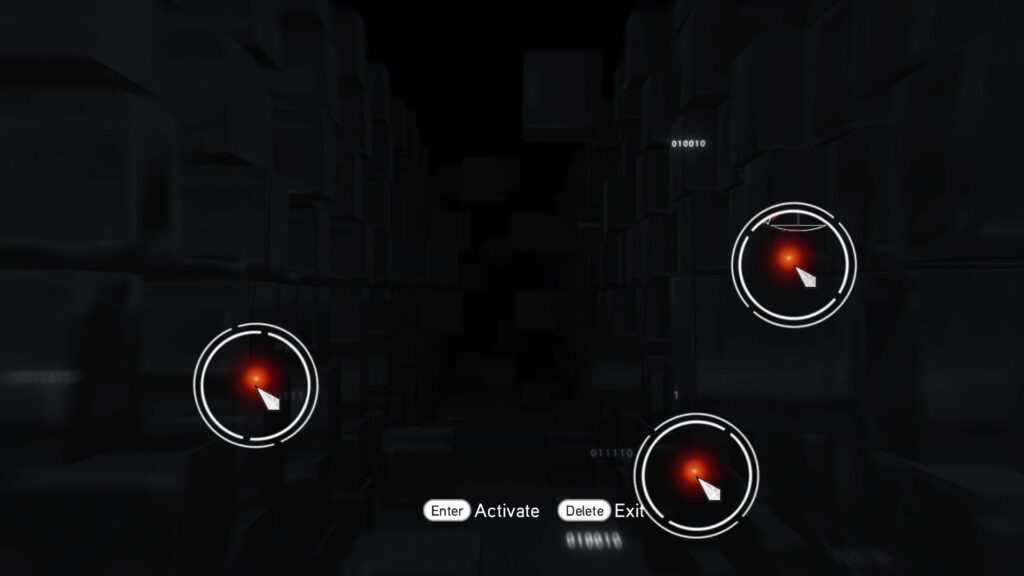
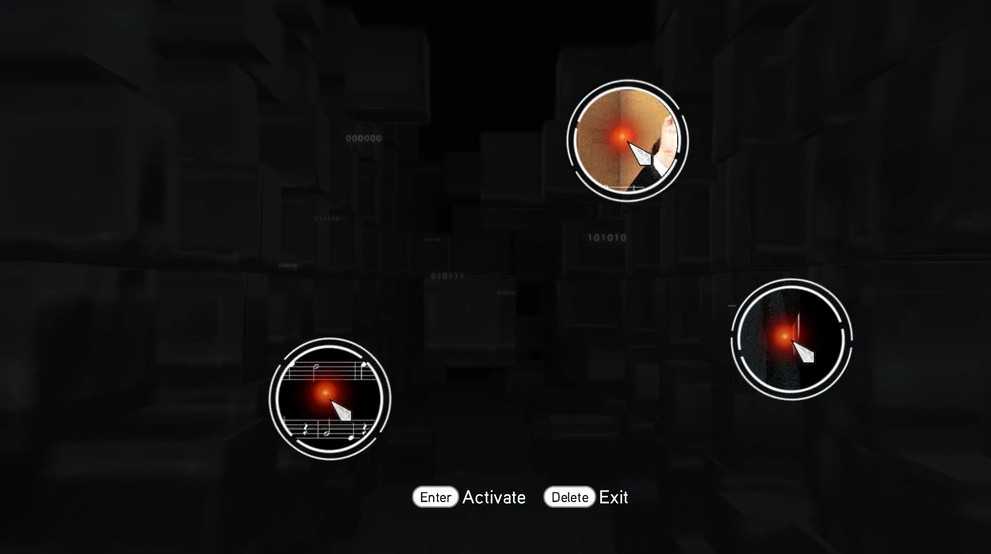
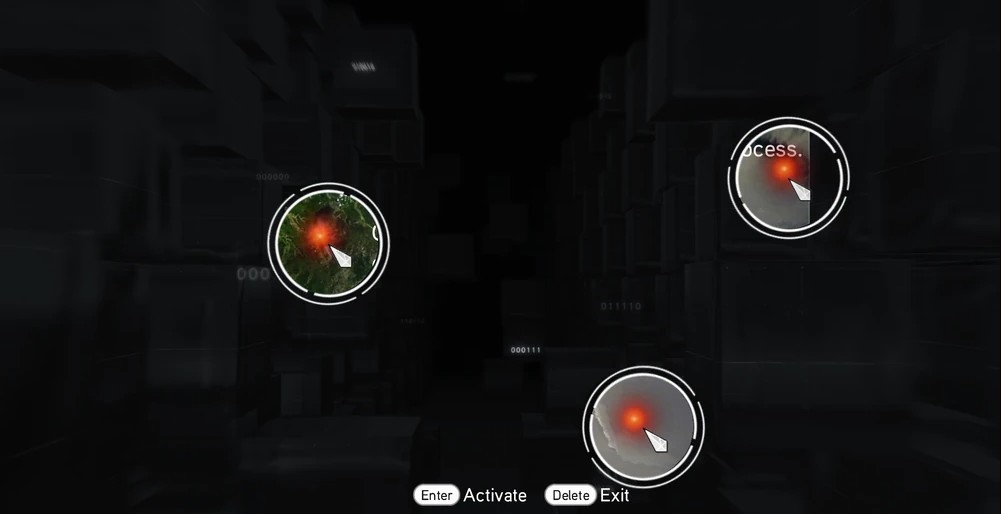
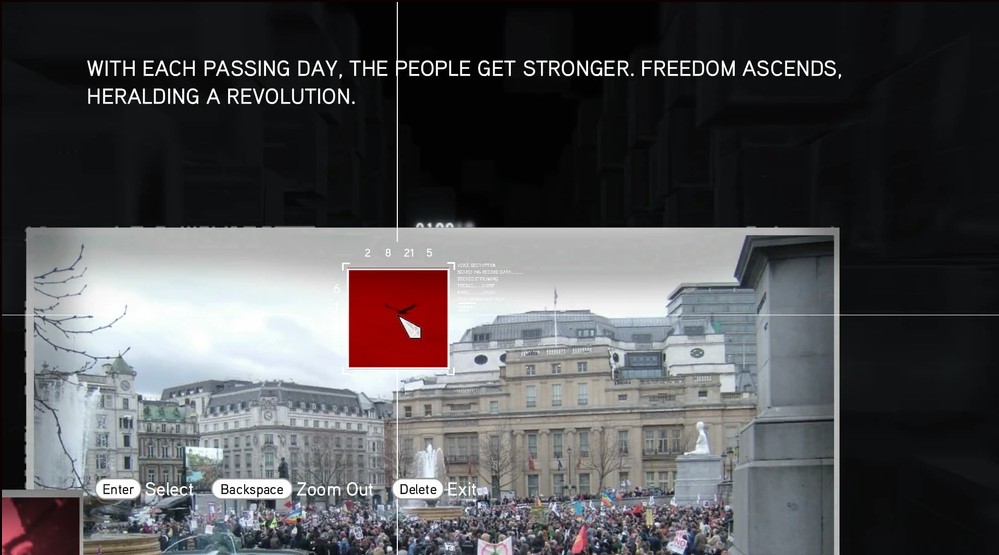
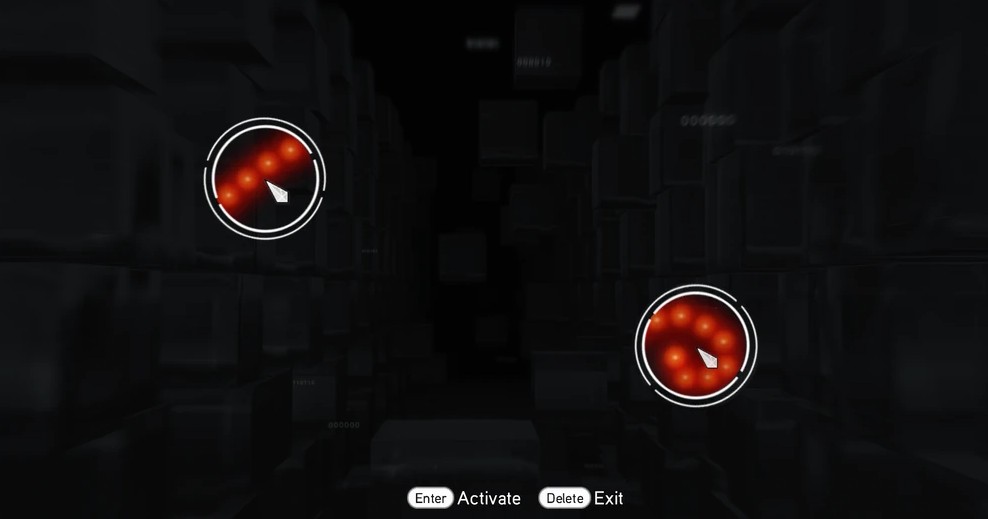
For the third puzzle you’ll have to pass the cybersecurity of the Anymus. Move the cursor through the screen looking for the blinking red lights, before the red circle completes.
Cluster 2
The first, second and third puzzles are a series of pictures that must be rearranged to show the correct photograph.
First puzzle solution: turn the first inner ring four times to the left, the second and first rings twice to the right. Then, turn the third and first rings three times to the left, and the fourth outer ring four times to the left.
Second puzzle solution: turn the combined first and third rings five times to the right, the second ring five times to the right too. Then, turn the third ring left four times, and the combined fourth and first rings twice to the left.

Third puzzle solution: turn the first ring right three times, the second ring right four times. Next, turn the combined third and second rings left five times, and the combined fourth and first ring to the right once.
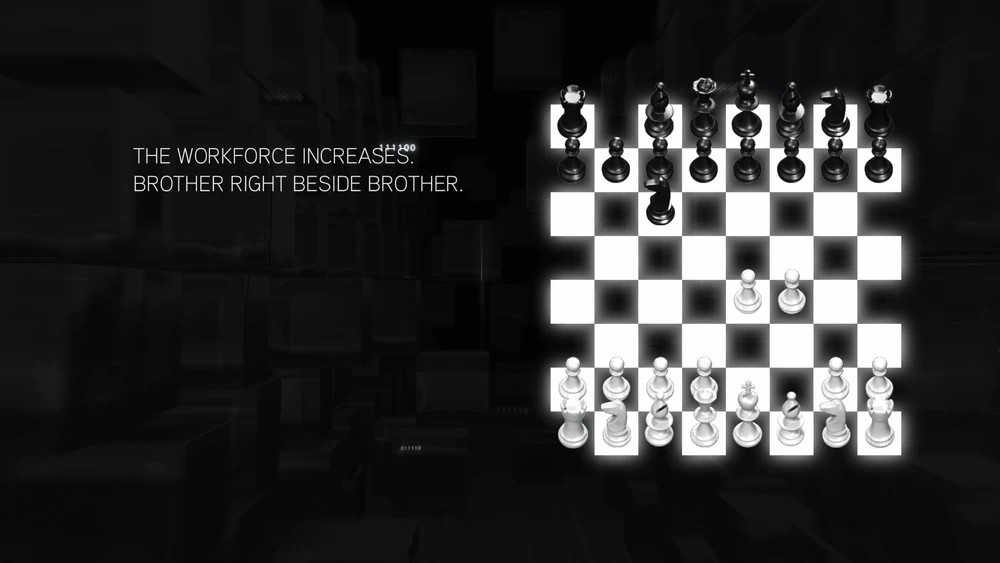
For the fourth puzzle of this second cluster, the chess puzzle continues.
“THE WORKFORCE INCREASES BROTHER RIGHT BESIDE BROTHER”
Solution: Move the pawn in F2 to F4
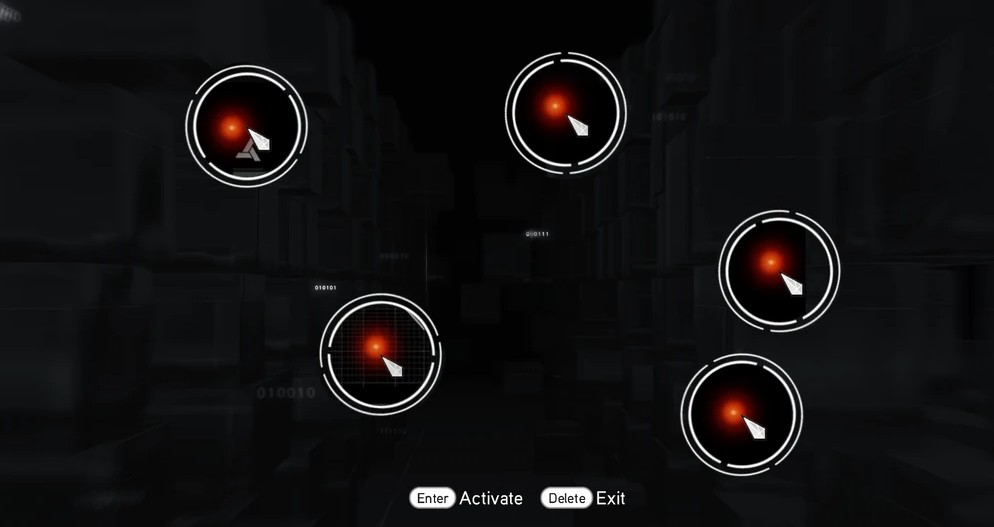
For the fifth and final puzzle in cluster 2 you’ll have to pass the cybersecurity of the Anymus. Move the cursor through the screen looking for the blinking red lights, before the red circle completes.
Cluster 3
To begin with, the first puzzle of this cluster shows 6 images and a hint to find the Abstergo logo in one of the photos.
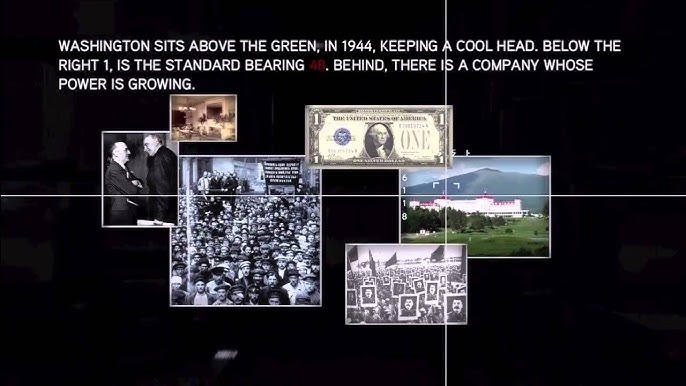
“WASHINGTON SITS ABOVE THE GREEN, IN 1944, KEEPING A COOL HEAD, BELOW THE RIGHT ONE, IS THE STANDARD BEARING 48, BEHIND, THERE IS A COMPANY WHOSE POWER IS GROWING”
“Above the green” refers to the green fields of the hotel photo, “below the right one” is literally that, below the right 1 of the one dollar bill. and the 48 refers to the colour red.
Following this analysis, you’ll find the Abstergo logo on the Hotel’s flag.
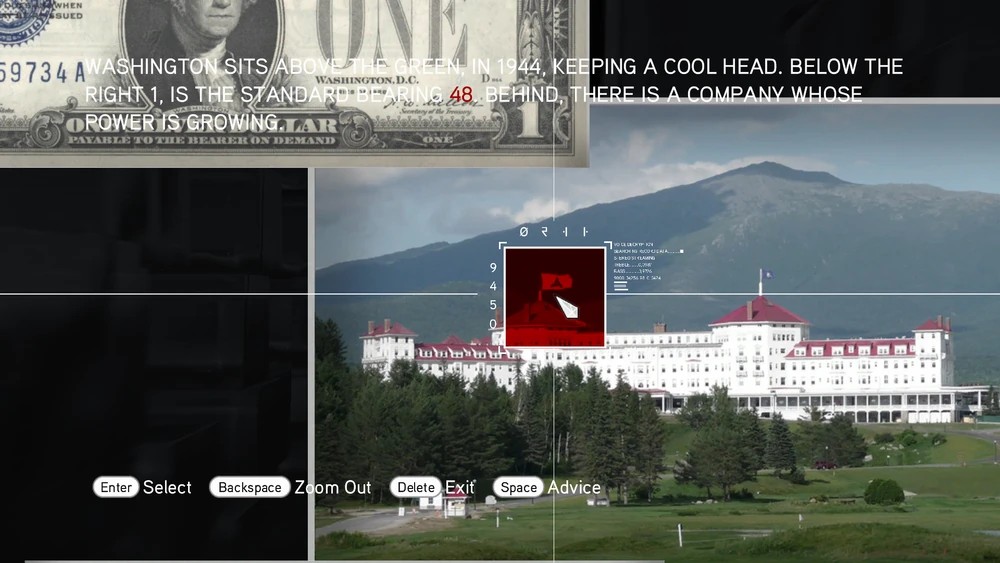
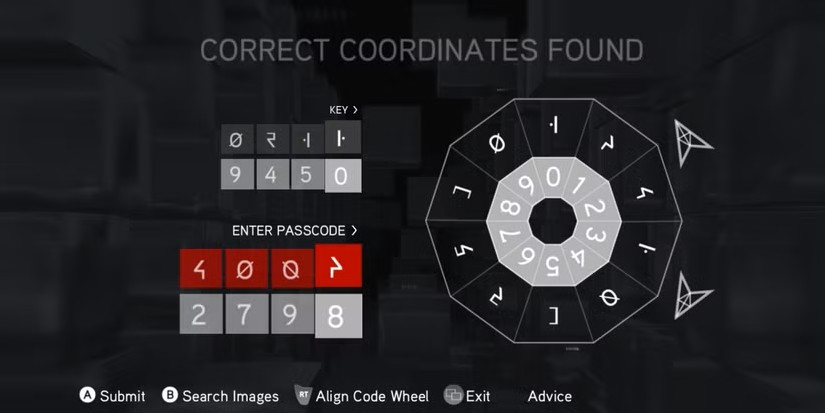
When you find the solution for this first puzzle it will give you the code for the second puzzle of this cluster. By the use of this code you’ll be able to enter the password. Align the first number and symbol combination on the key, then you will be able to enter the passcode.
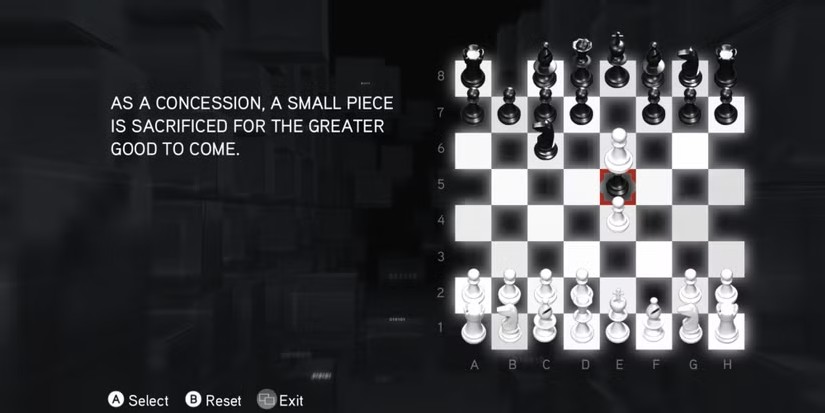
Continuing with the chess puzzle on the third part of this cluster. For this one the hint reads as follows: “AS A CONCESSION, A SMALL PIECE IS SACRIFIED FOR THE GREATER GOOD TO COME.”
Solution: Move the white pawn from F4 to E5
For the fourth and last puzzle you’ll have to pass the cybersecurity of the Anymus. Move the cursor through the screen looking for the blinking red lights, before the red circle completes.
Cluster 4
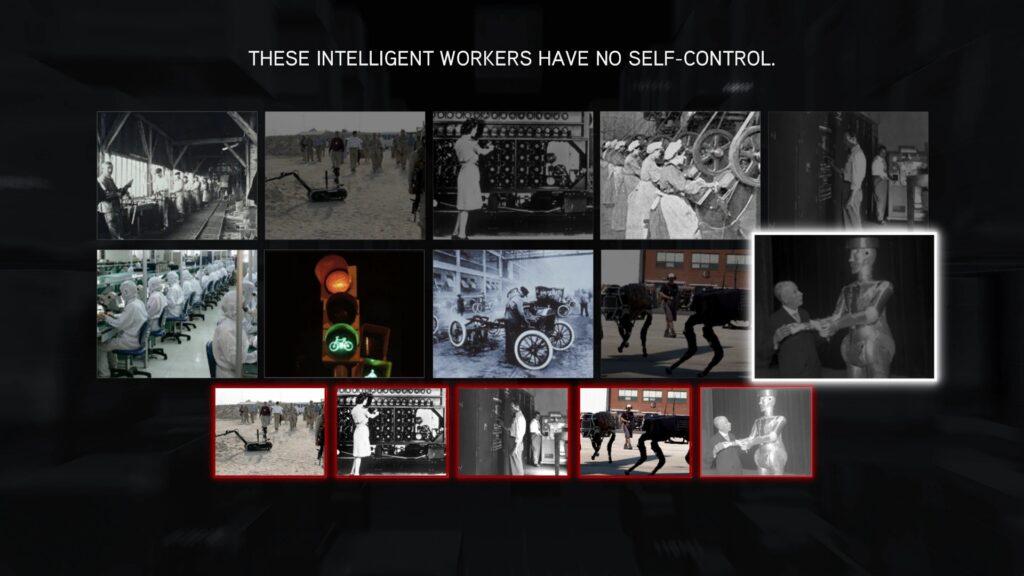
The first puzzle of this cluster shows ten pictures from which you’ll have to select five, following the hint given. “THESE INTELLIGENT WORKERS HAVE NO SELF-CONTROL.”
Solution: Select all five photos that show a computer or robot with a human operator. Images 2, 3 and 5 on the first row. Images 4 and 5 on the second row.
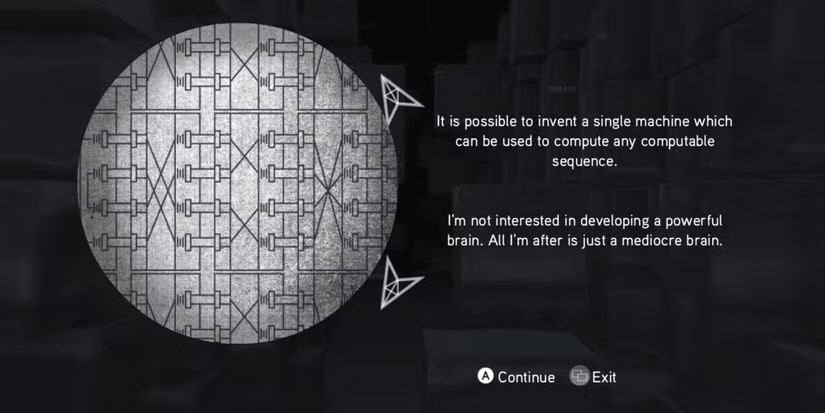
The second puzzle is a ring turning puzzle to complete the image.
Solution: move the combined first and fourth rings once to the right, the second ring four times to the left. Then, move the combined third and first rings four times to the right, and the combined fourth and second rings once to the right.
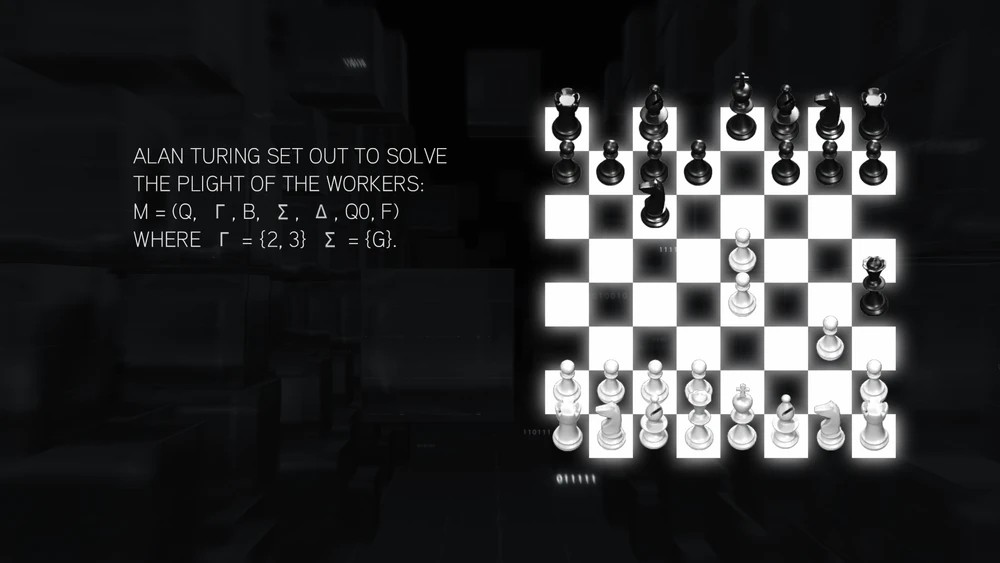
For the third puzzle, the chess board reappears with a new hint to progress the game. “ALAN TURNING SET OUT TO SOLVE THE PLIGHT OF THE WORKERS.”
Solution: Move the pawn from G2 to G3
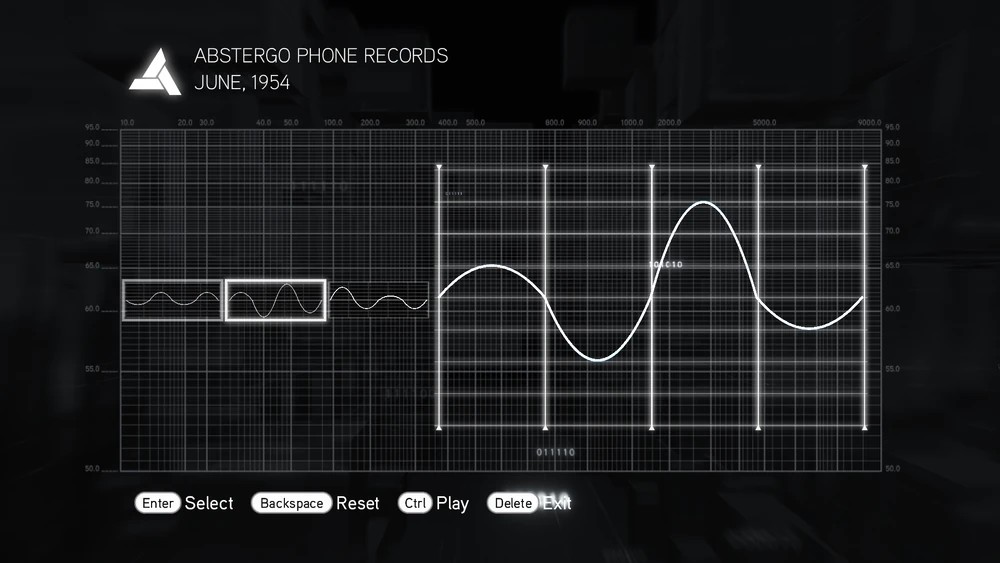
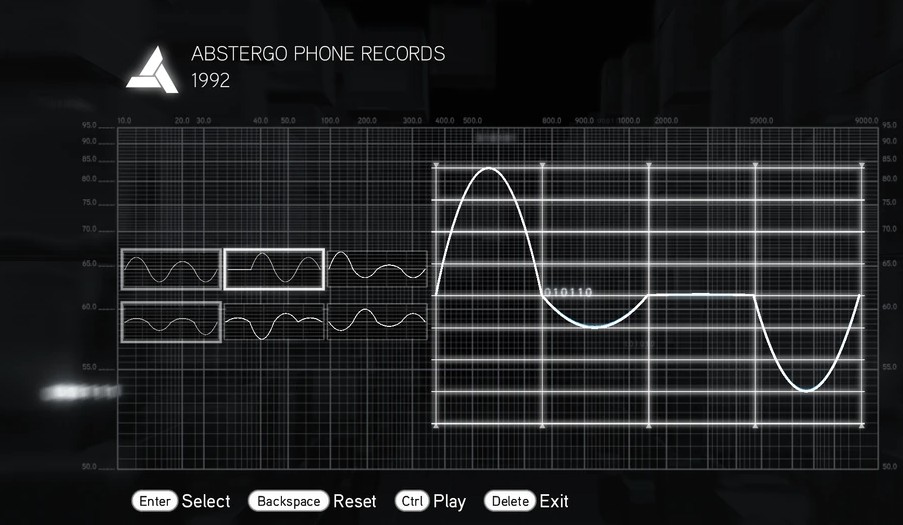
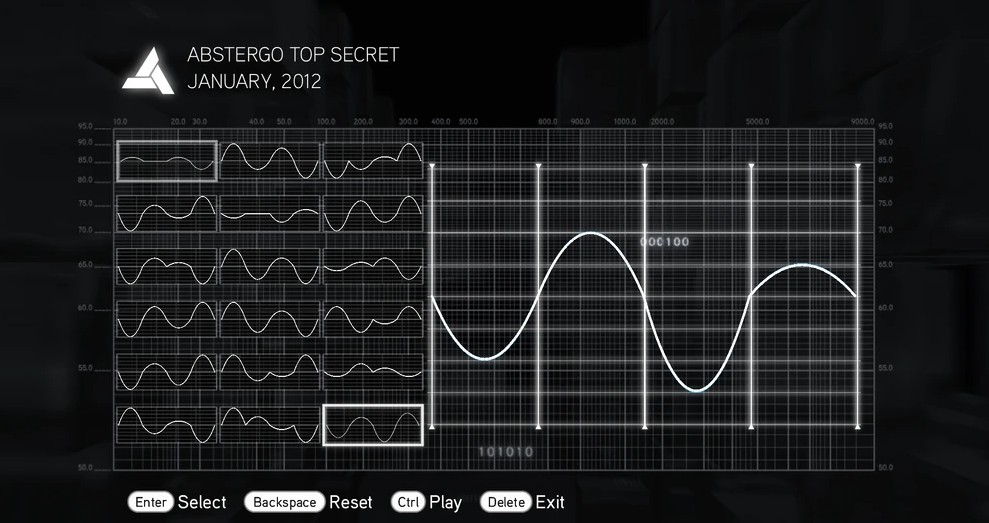
Moving on to the fourth puzzle of this cluster, you’ll have to match the wave length of the audio by using two or more wavelengths to pass this puzzle.
Solution: Select first the wavelength in the middle and then the one on the left.
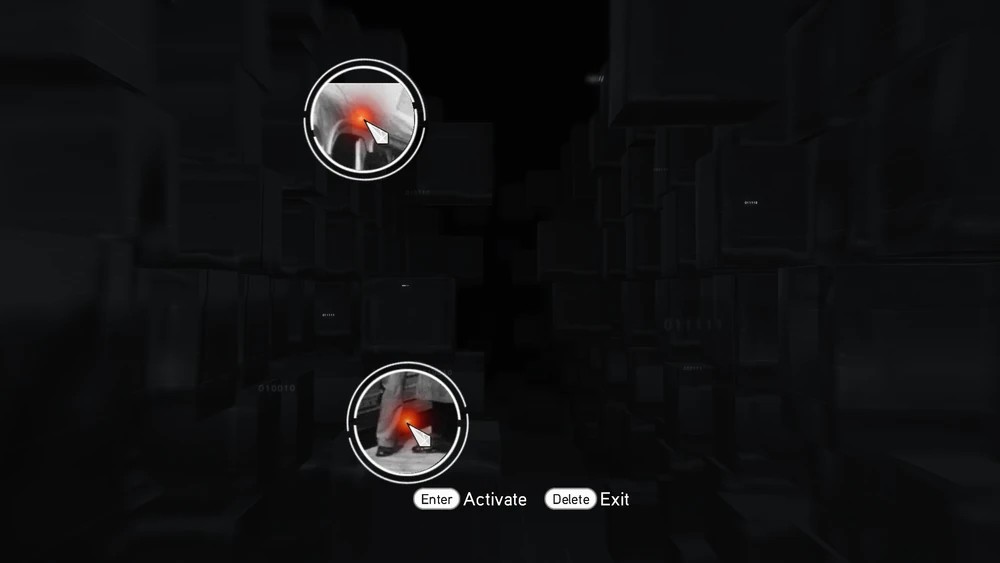
For the fifth and last puzzle in this cluster, you’ll have to pass the cybersecurity of the Anymus. Move the cursor through the screen looking for the blinking red lights, before the red circle completes.
Cluster 5
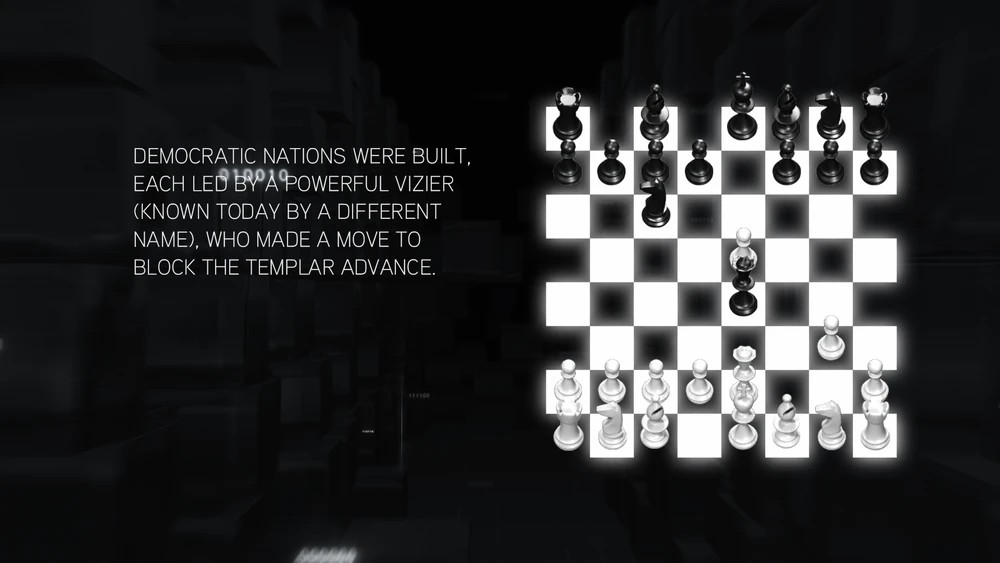
Unlike other clusters, cluster 5 begins with the chess puzzle as the first challenge.
“DEMOCRATIC NATIONS WERE BUILT, EACH LED BY A POWERFUL VIZIER (KNOWN TODAY BY A DIFFERENT NAME), WHO MADE A MOVE TO BLOCK THE TEMPLAR ADVANCE.”
Solution: move the queen from D1 to E2.
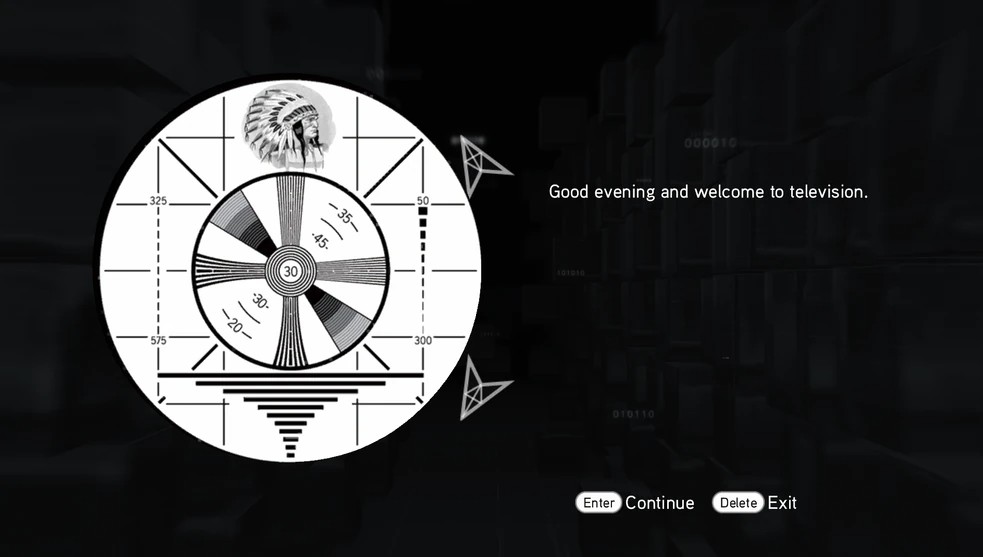
For the second puzzle you’ll see several images in which you’ll need to search for a volt of electricity. Zoom in to the image in the top left corner to find it.
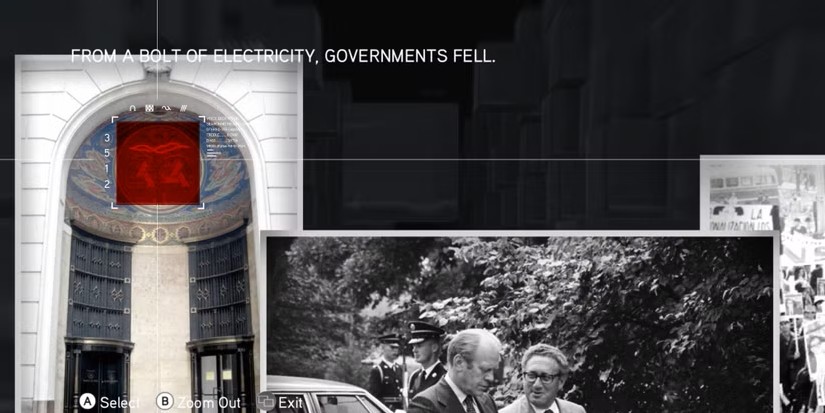
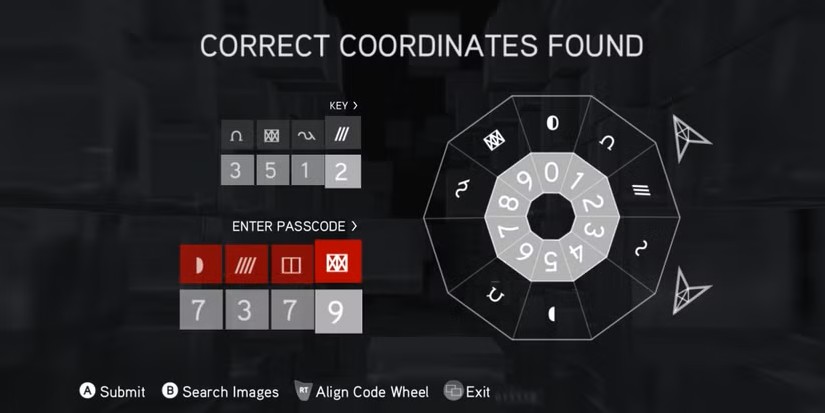
Once found, this location will give you the code for the third puzzle. By entering the symbols in the ring puzzle you’ll obtain the puzzle.
For the fourth and last puzzle of this cluster, move the cursor through the screen looking for the blinking red lights, before the red circle completes.
Cluster 6
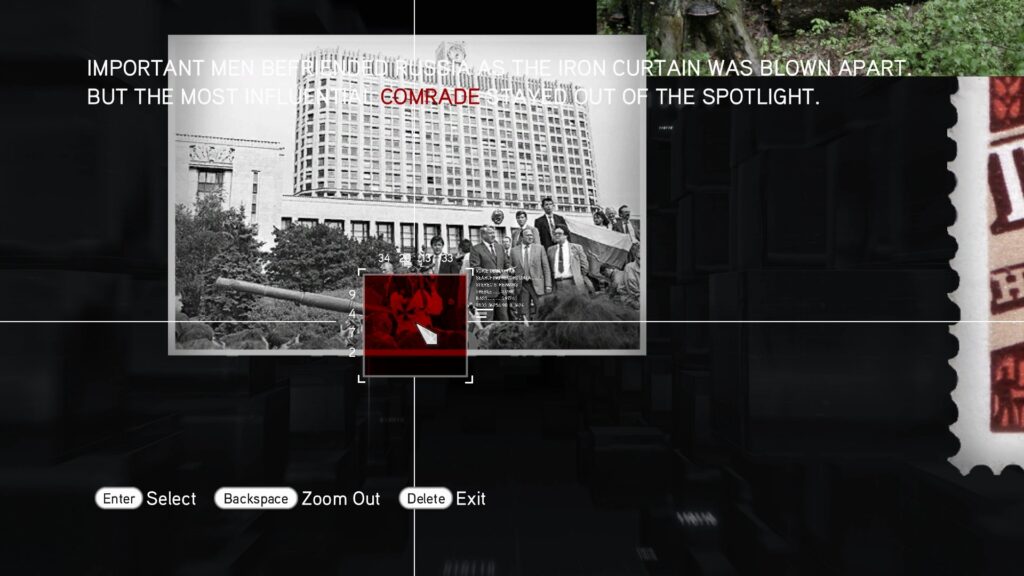
The first puzzle in the sixth cluster shows several images in which you’ll need to find the templar cross.
“IMPORTANT MEN BEFRIENDED RUSSIA AS THE IRON CURTAIN WAS BLOWN APART. BUT THE MOST INFLUENTIAL COMRADE STAYED OUT OF THE SPOTLIGHT.”
Solution: select the area below in the picture on the left corner.
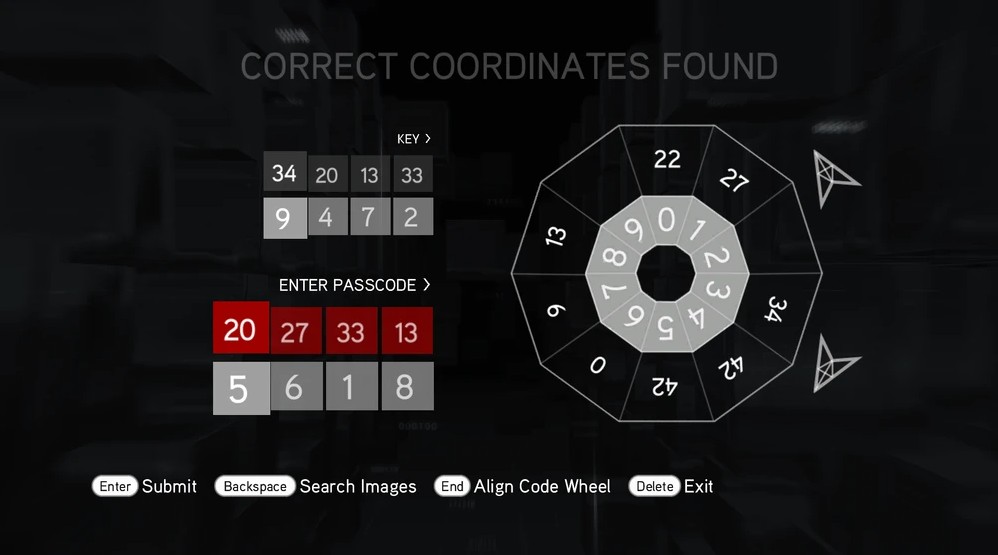
This selection will give you the code to resolve the second puzzle. In this new puzzle the missing numbers are 20 and 33, obtained from the 2nd and 4th pair of given numbers.
Solution: the passcode is 20, 27, 33, 13.
For the third puzzle we see the audio waves again. In order to solve it, match the wave length of the audio by using two or more wavelengths to pass this puzzle.
Solution: select the waves 1 and 2 from the first row and the first from the second row.
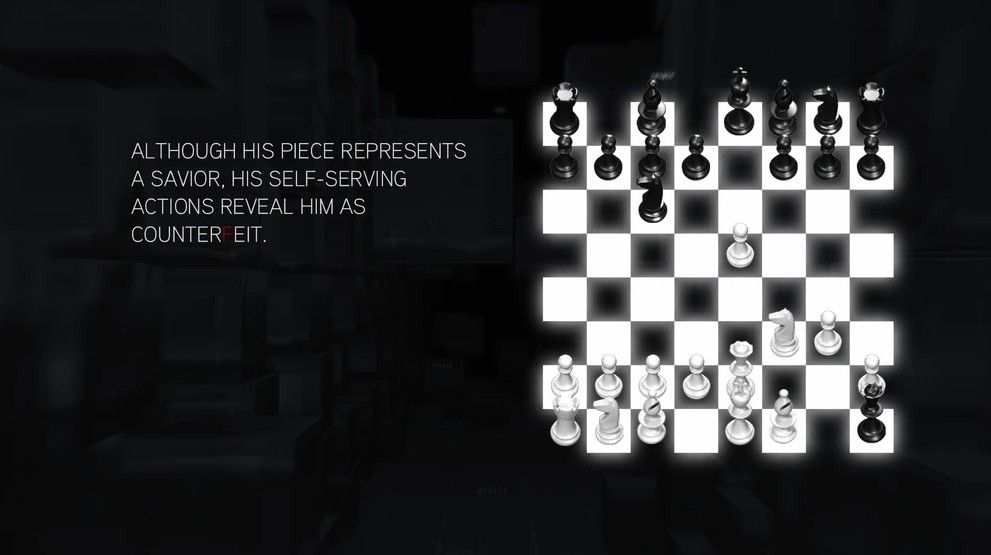
The Chess board returns for the fourth puzzle of this sixth cluster. In this puzzle the hint reads: “ALTHOUGH HIS PIECE REPRESENTS A SAVIOR, HIS SELF-SERVING ACTIONS REVEAL HIM AS COUNTERFEIT.”
Solution: Move the knight from G1 to F3
For the last part of this cluster, move the cursor through the screen looking for the blinking red lights, before the red circle completes.
Cluster 7
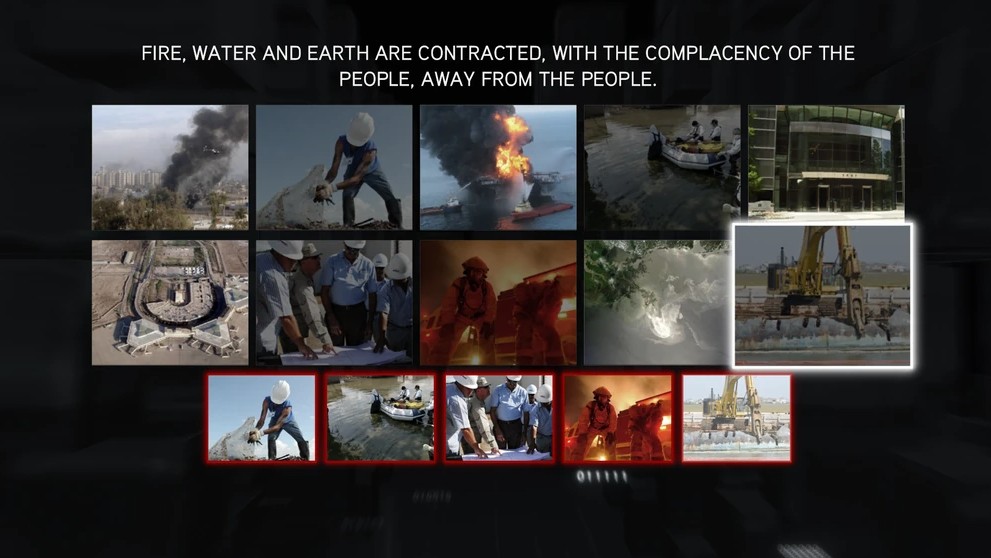
The first puzzle of the seventh cluster shows a selection of ten images from which you’ll have to select five, following the hint given. “FIRE, WATER AND EARTH ARE CONTRACTED, WITH THE COMPLACENCY OF THE PEOPLE, AWAY FROM THE PEOPLE.”
Solution: Select all five images showing the energy industry at work. These are, images 2 and 4 from row one. Images 2, 3, and 5 from row two.
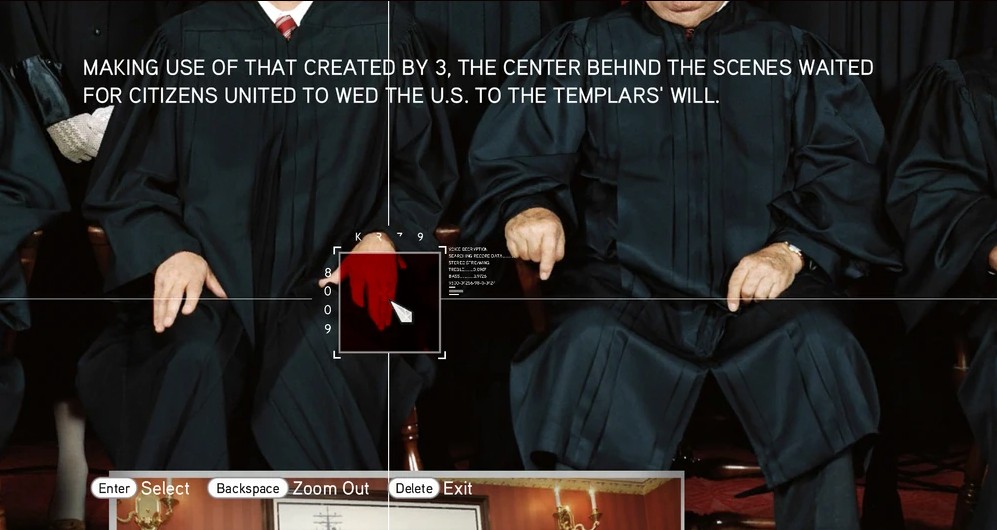
For the second puzzle, you’ll see several images in which you’ll need to find the templar ring. Zoom in the biggest picture and scan the hands of the people sitting.
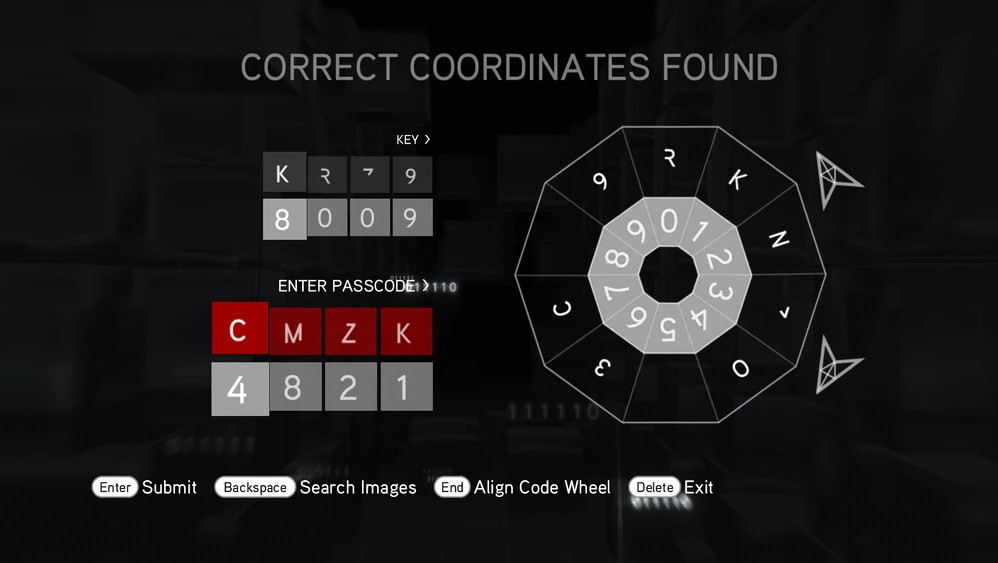
Once found, this location will give you the code for the third puzzle. By entering the symbols in the ring puzzle you’ll obtain the puzzle.
Solution: The password is C, M Z, K.
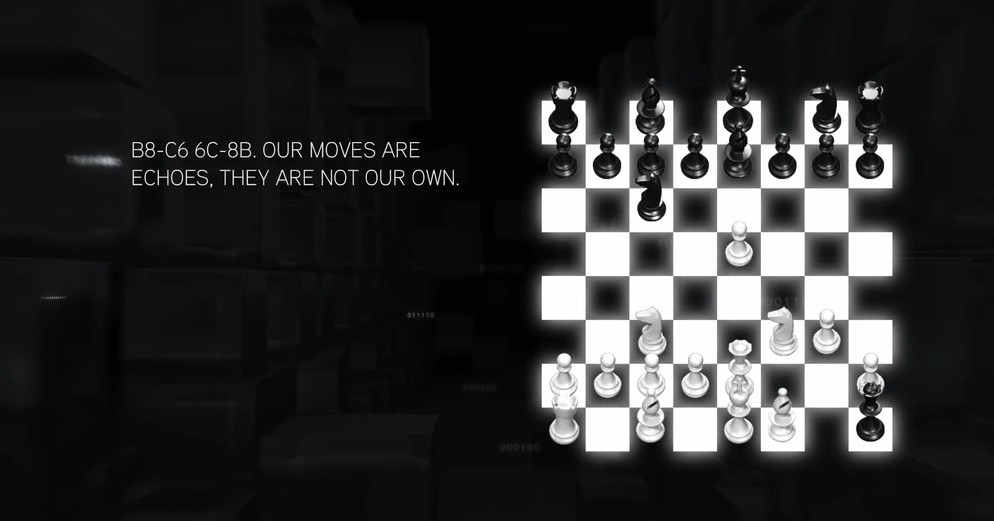
The chess board returns for the fourth puzzle of this cluster with the hint that reads: “ B8-C6 6C-8B. OUR MOVES ARE ECHOES, THEY ARE NOT OUR OWN.”
Solution: move the knight from B1 to C3.
For the last part of this cluster, move the cursor through the screen looking for the blinking red lights, before the red circle completes.
Cluster 8
The first puzzle is a picture that must be rearranged to show the correct photograph by turning the rings in a certain order.
Solution: move the combined first and second rings once to the left, the combined second and fourth four times to the left, and the combined fourth and first ring twice to the right.
For the second puzzle of this eighth cluster you’ll have to select two or more wave shapes to match the given audio waves.
Solution: select the first wave on the first row. Then, the second on the second row, and the second and third on the third row.

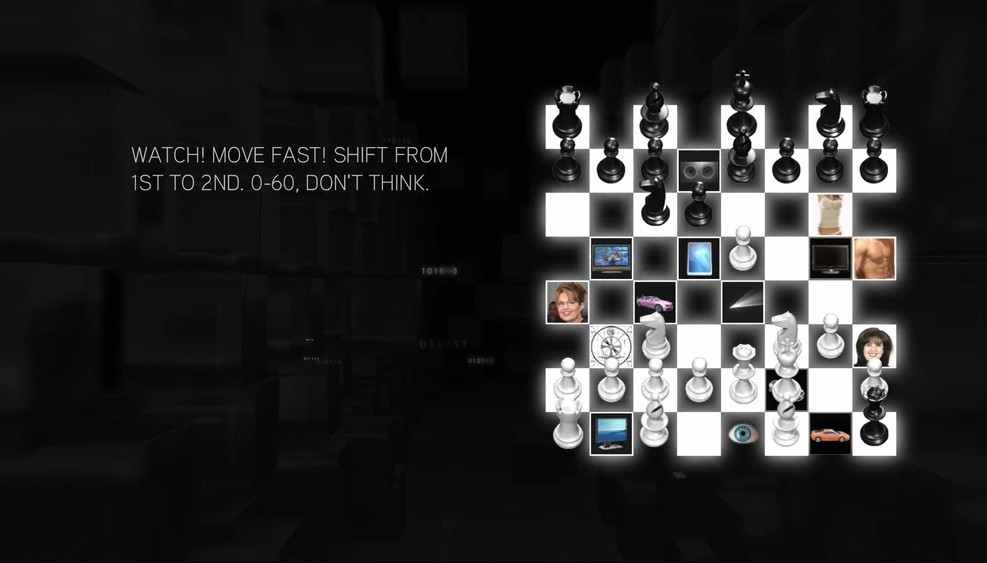
The chess puzzle in the third phase of these clusters shows images in some areas or the board. The hint reads: “WATCH! MOVE FAST! SHIFT FROM 1ST TO 2ND. 0-60, DON’T THINK.”
Solution: move the king from 1E to 2F.
For the last part of this cluster, move the cursor through the screen looking for the blinking red lights, before the red circle completes.
Cluster 9
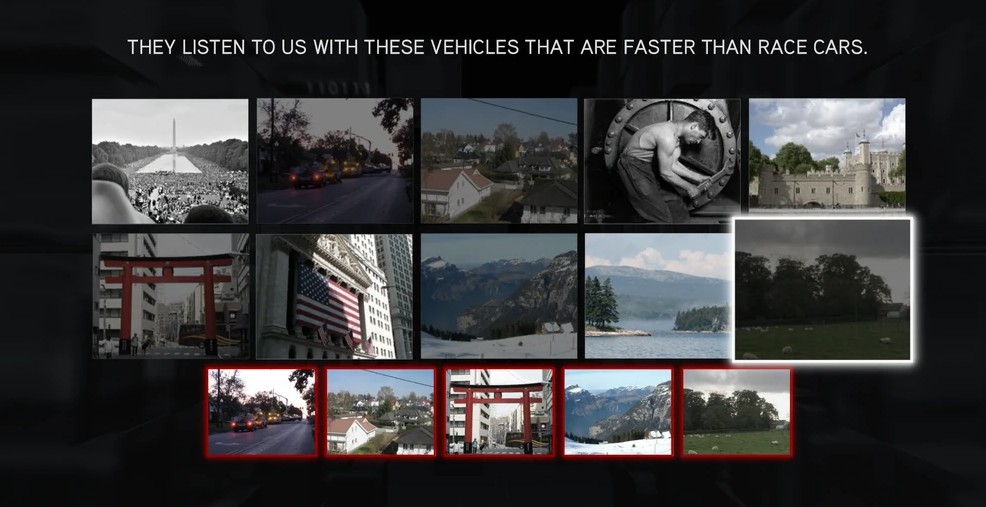
The first puzzle of this cluster shows a selection of 10 images, from which you’ll need to select five of them using the hint given as a guide. “THEY LISTEN TO US WITH THESE VEHICLES THAT ARE FASTER THAN RACE CARS.”
Solution: Select all images that feature visible wires. Images 1 and 2 from row one. Images 1, 3, and 5 of row two.
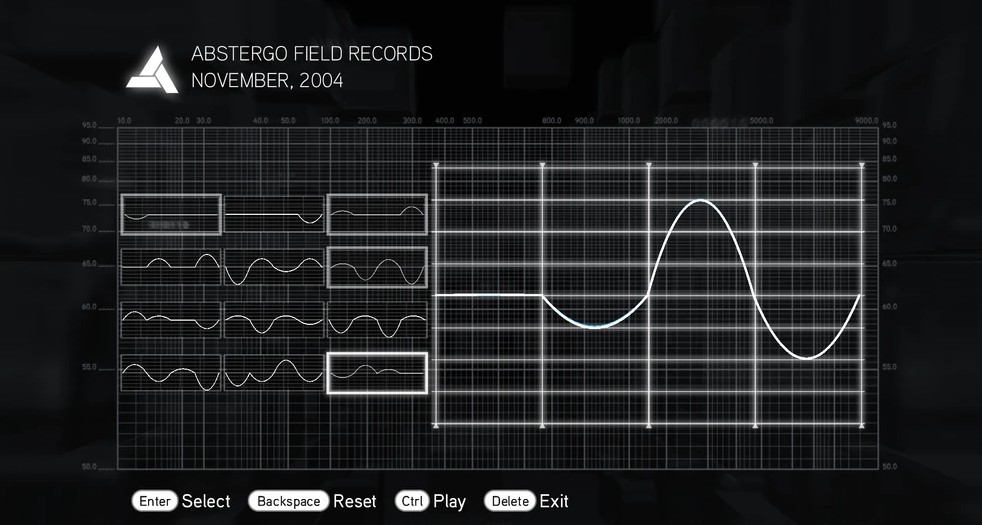
In the second puzzle you’ll have to select two or more wave shapes to match the given audio waves.
Solution: Select the first and third wave of the first row, the third wave in the second row, none of the third row and the third of the fourth row.
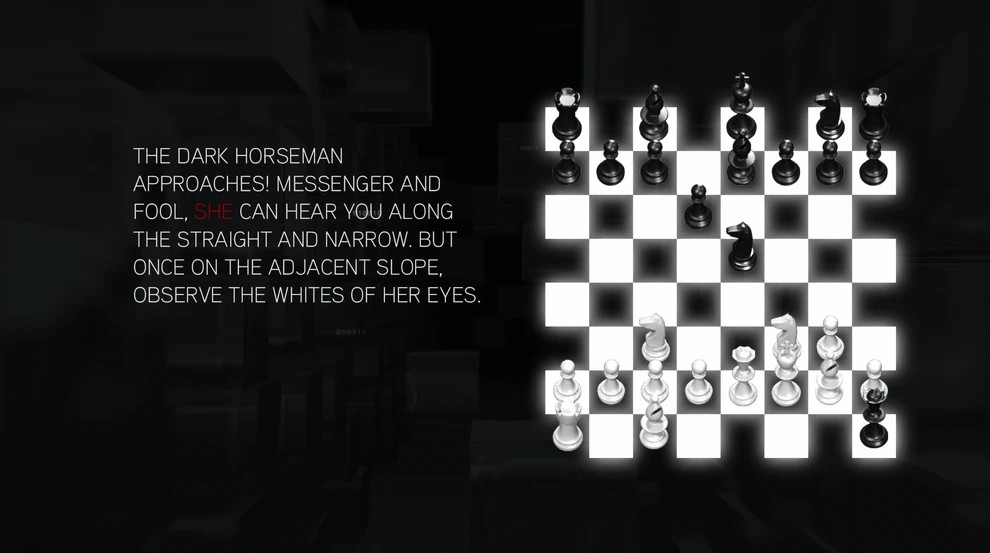
The chess board returns in the third puzzle of this cluster. This time the hint reads:
“THE DARK HORSEMAN APPROACHES! MESSENGER AND FOOL, SHE CAN HEAR YOU ALONG THE STRAIGHT AND NARROW. BUT ONCE ON THE ADJACENT SLOPE, OBSERVE THE WHITER OF HER EYES.”
Solution: move the bishop from 1F to 2G.
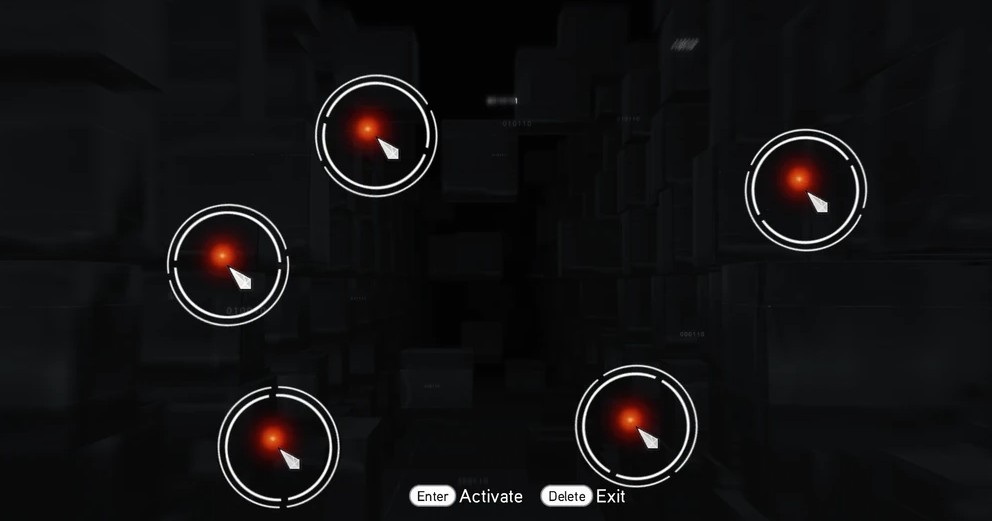
For the last part of this cluster, move the cursor through the screen looking for the blinking red lights, before the red circle completes.
Cluster 10
The last cluster of Assassin’s Creed Brotherhood is the largest of them all. It contains seven puzzles and the final answer to this mission to uncover the truth.
The first puzzle for this cluster is a picture that must be rearranged to show the correct photograph by turning the rings in a certain order.
Solution: move the combined first and third ring twice to the right. Then, move the combined second and first rings twice to the right, and the combined fourth and second rings five times to the right.
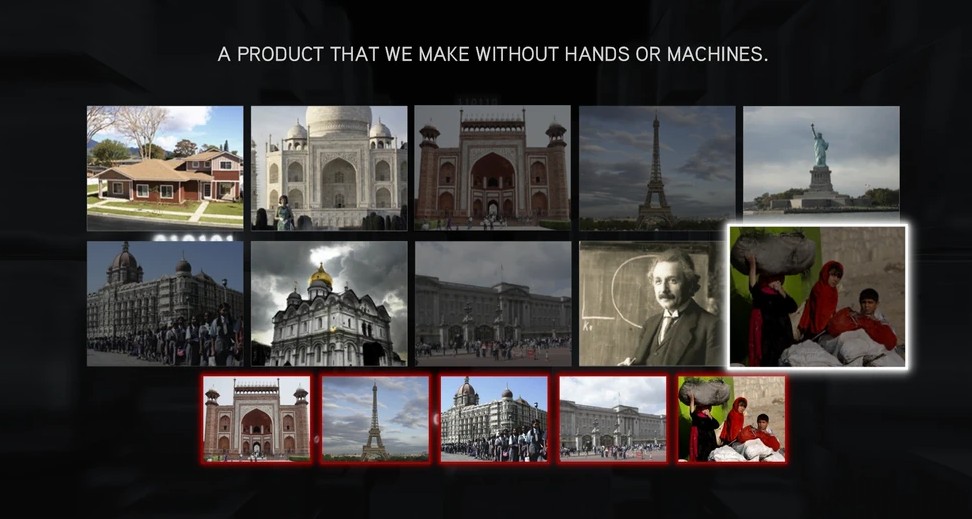
The second puzzle of this cluster shows a selection of 10 images, from which you’ll need to select five of them using the hint given as a guide.
Solution: select all five images that show children. Images 3 and 4 on the first row. Images 1, 3, and 5 on the second row.
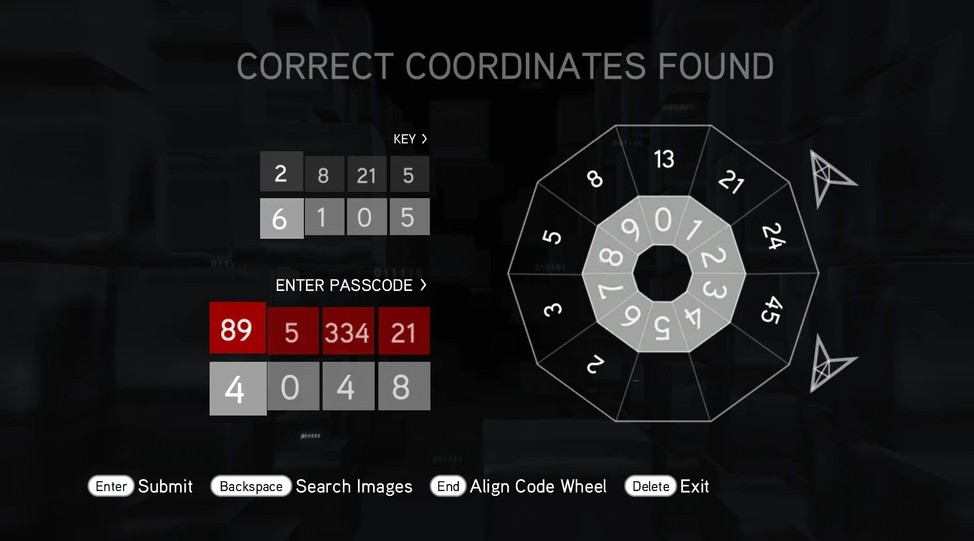
In the third puzzle you’ll see several images in which you’ll need to find the eagle, symbol of the Assassins.
This location will give you the code for the fourth puzzle. By entering the symbols in the ring puzzle you’ll obtain the puzzle.
Solution: the password is 89, 5, 334, 21.
In the fifth puzzle of this last cluster you’ll have to select two or more wave shapes to match the given audio waves.
Solution: First wave from the first row and the third wave of the sixth row.
The seventh puzzle is the last chess board of this series. Now all the squares on the board show the Abstergo logo.
Solution: move the king off the board.
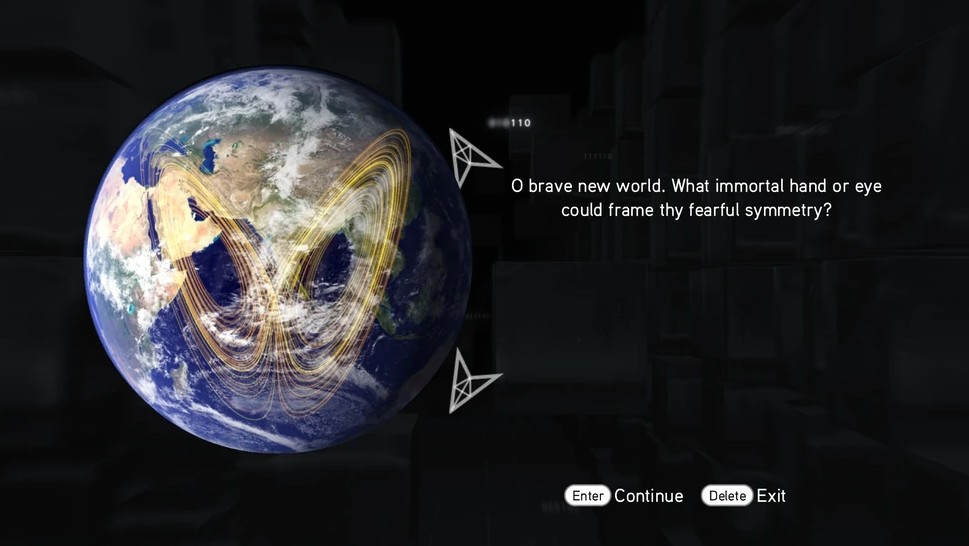
For the last puzzle, you’ll have to find the beginning and the end points of a large swirl made up from red blinking lights.
Instead of revealing a video memory like in “the Truth” in Assassin’s Creed II, this new mission reveals the message “the miracle is in the execution”.
Nothing is True Everything is Permitted
Now you know the locations and solutions to all rifts in Assassin’s Creed Brotherhood. Soon we will continue with the search for the truth. Future guides will uncover the secrets hidden by Abstergo. However, now it’s your turn. Add Assassin’s Creed Brotherhood to your gamer CV and carry on the adventure on to Assassin’s Creed Revelations.
Find fellow Assassins in Gamers.online, a space created by gamers for gamers.
Game on! 🦅🗡️